Project pathway
The quickest route to the right decision.

 Tuesday, 27 October 2026 by Oliver Fontana - Managing Director
The desktop cockpit and construction-site app are intended to connect office planning, project documents and daily reports. Planning and project processing are envisaged for the office. On site, work is intended to be recorded and documented directly.
An explosive ordnance project starts with questions and documents, then moves through planning, site work and checks to a clear record of the work. The office and site team work on the same task, often at different times and with different information. FONTANA-EOD is therefore developing its own digital work platform to connect those steps within the right project context.
The desktop Cockpit is intended to provide an overview and support coordination in the office. The site app is designed to give staff on site the information and input options relevant to their work. Both areas are intended to refer to the same project information and document versions.
The operating views shown illustrate the intended workflows of the platform under development. Individual interfaces and functions are already available and have been tested. The complete workflow, with its intended users, equipment and document routes, is still being brought together and checked.
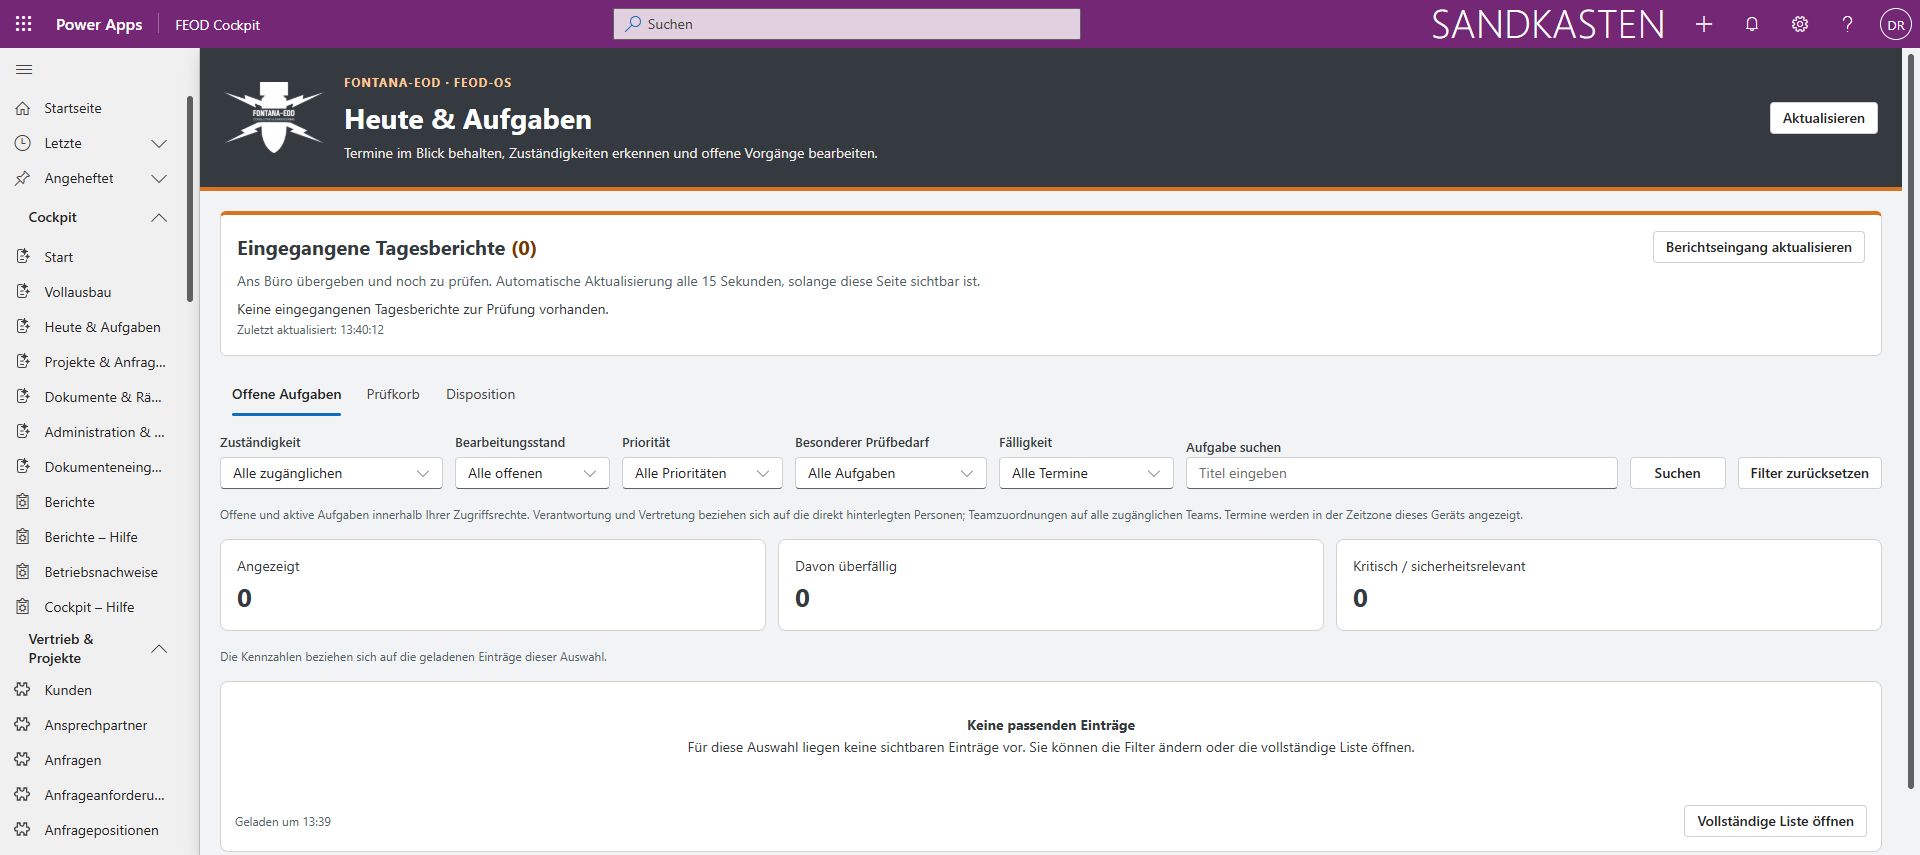
Today and Tasks brings incoming daily reports and office task management together. Filters for responsibility, status, priority, review requirements and due date help narrow the selection to the work that matters at that moment. A search complements these filters.
The full list remains accessible alongside this filtered view. Staff can first look at a particular set of tasks, then return to the wider overview when needed. The interface helps them find their bearings each day: what is due, which reports have arrived, and which matters should be looked at next?
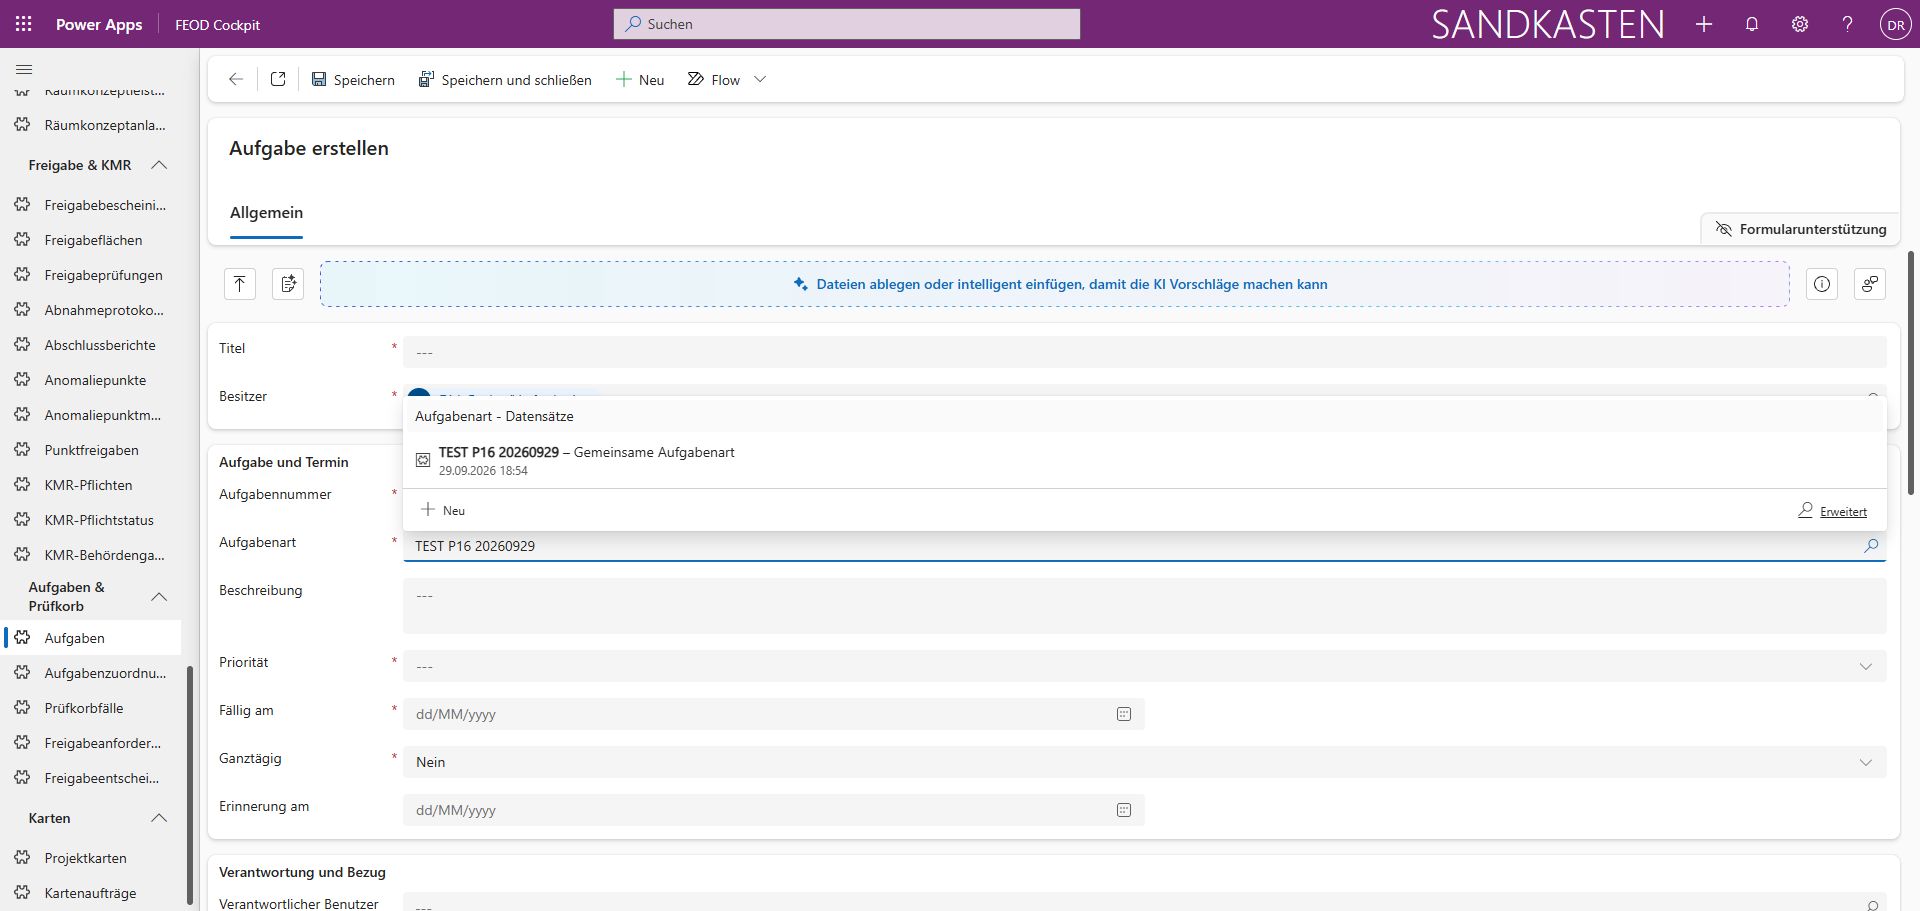
When creating a task, staff enter its title, type and description together. The title names the issue, the type categorises it, and the description records what needs to be done. The task-type selection shown is therefore part of preparing a specific task.
Priority, due date, all-day status and a reminder add the scheduling details. These help staff find the task in the subsequent list and take its deadline into account. The process combines a clear description with visible planning information, rather than storing only a short note that may be hard to place later.
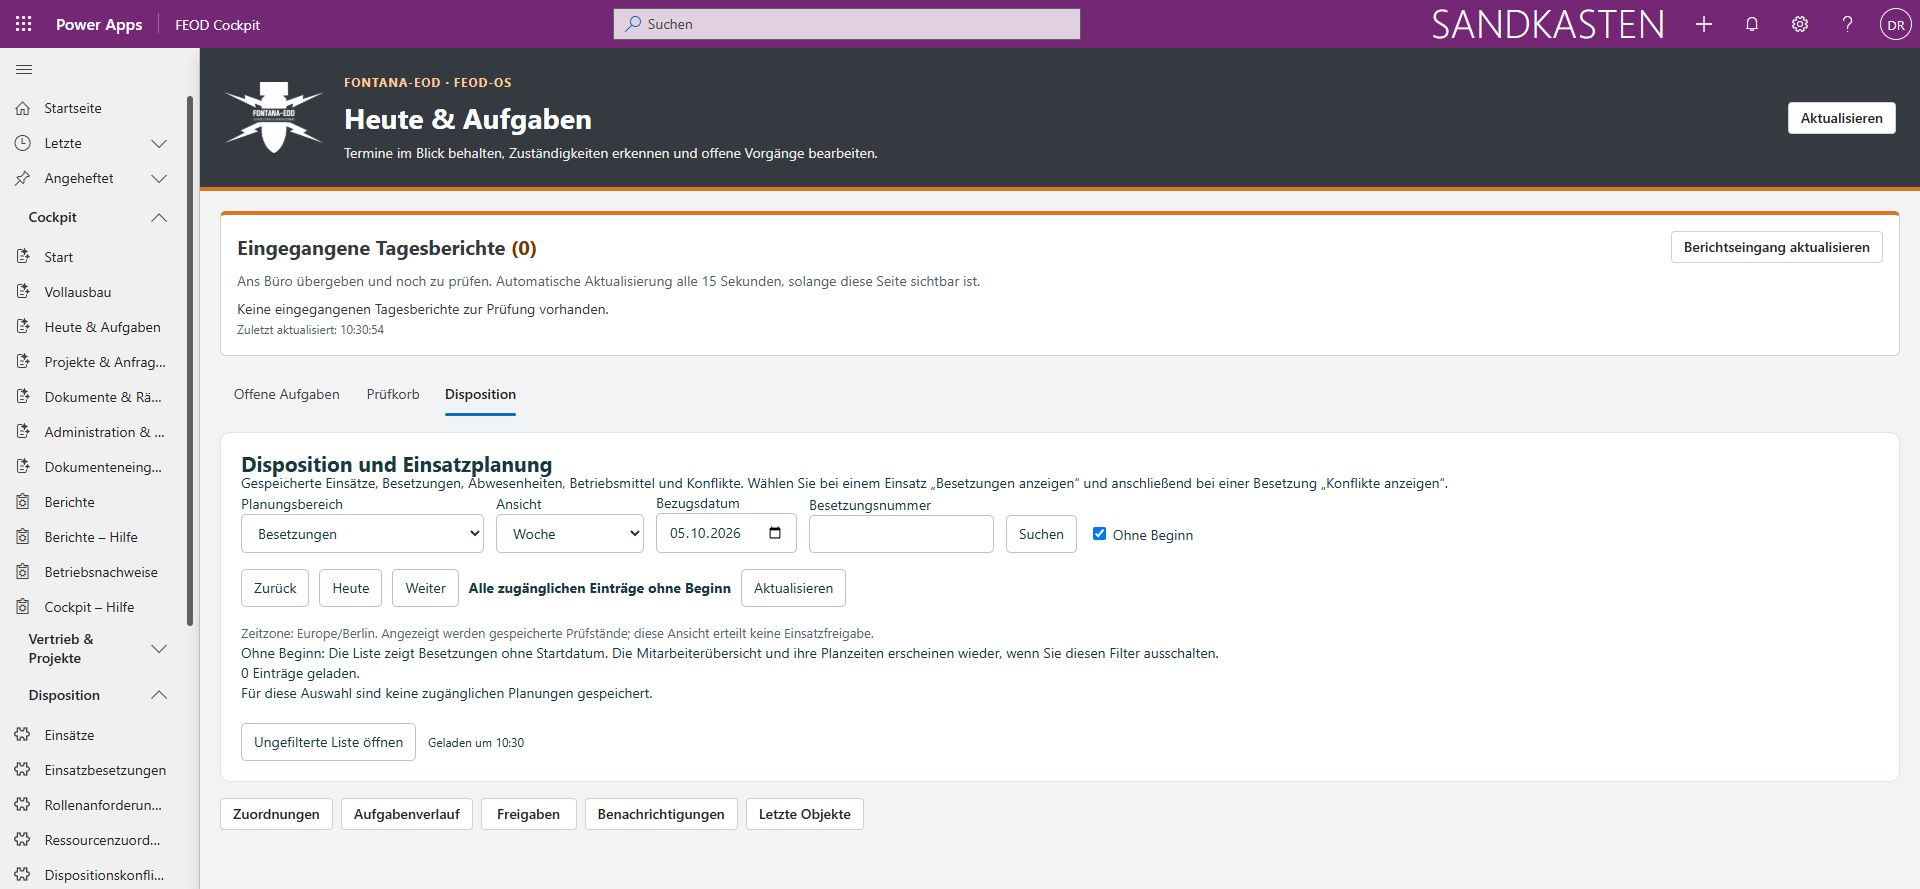
The scheduling view arranges deployments and staffing assignments within the selected planning area. The view and reference date can be used to display a week, for example. Staff can search for a staffing assignment number; the No start date filter shows assignments without a set start.
Back, Today and Next change the period displayed. Refresh reloads the current information; Open unfiltered list leads to the complete list. Once a deployment and staffing assignment have been selected, further details and conflict warnings are planned. This keeps the schedule connected to the associated responsibilities.
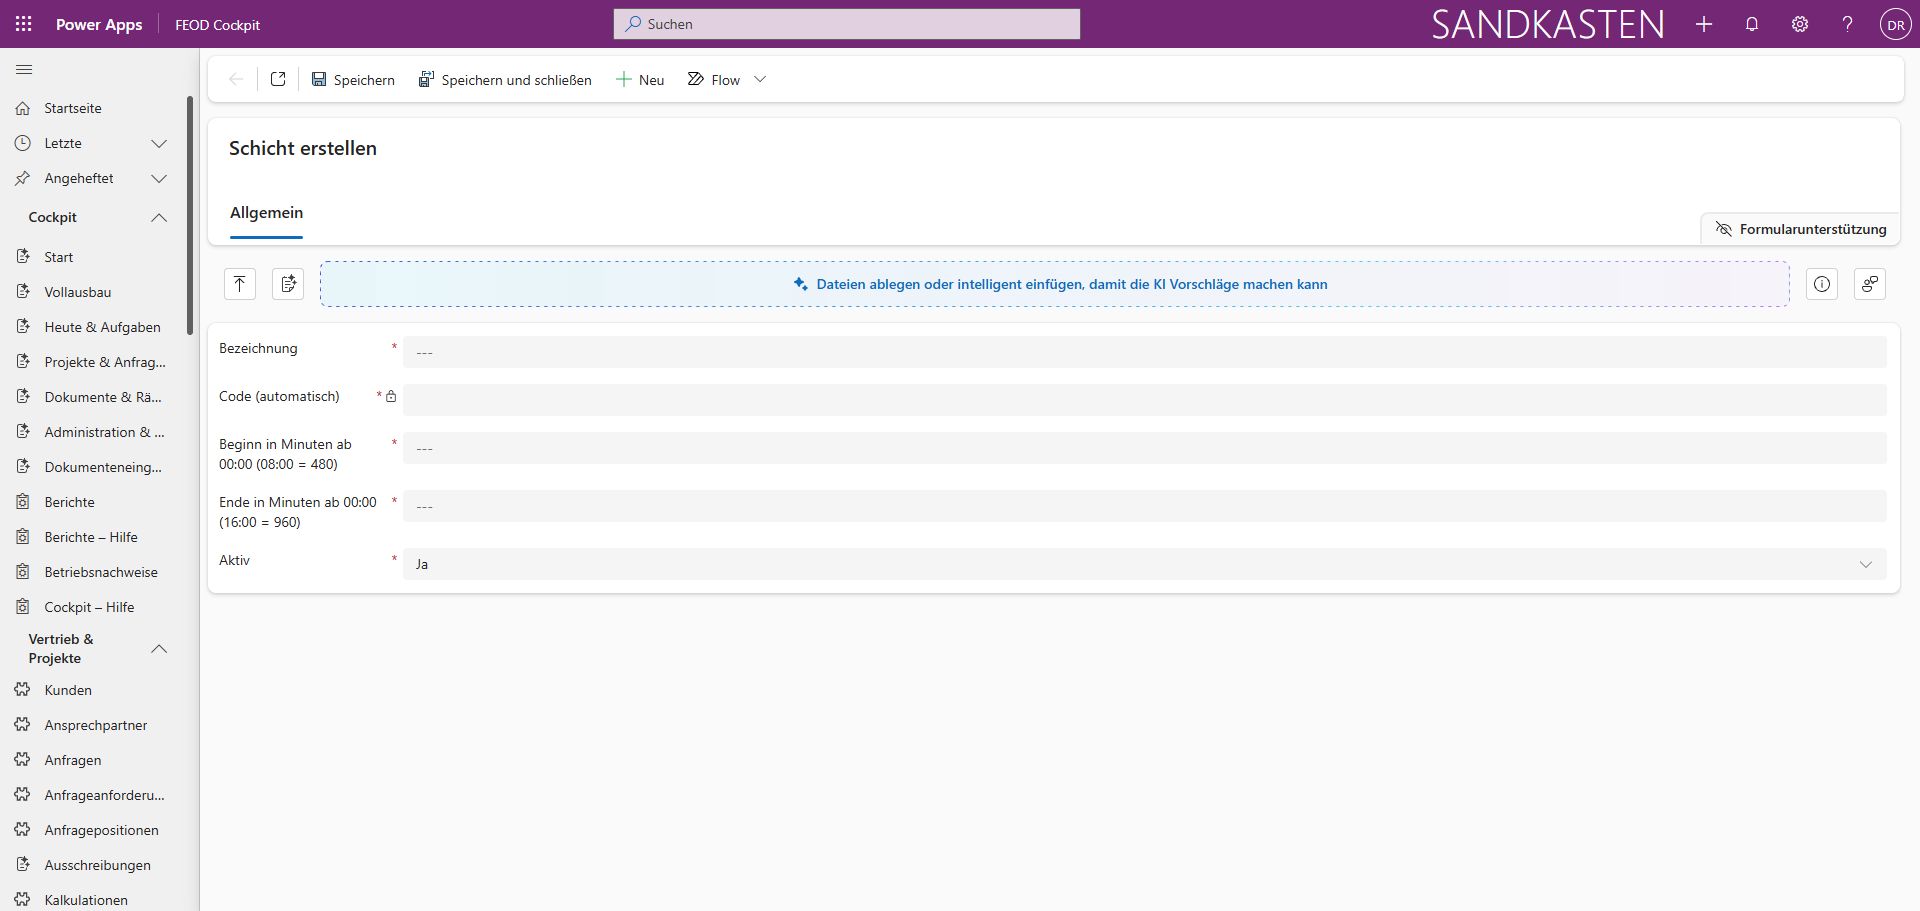
The new-shift form combines its name with the start and end times. Times are entered as minutes from 00:00; the code is marked as an automatically populated field. The name makes the shift recognisable when selected later.
The Active field also records whether the shift is in use. The shift's times and active status are therefore maintained in one place. This view concerns the shift master data; assigning a person or a specific deployment belongs to the corresponding planning process.
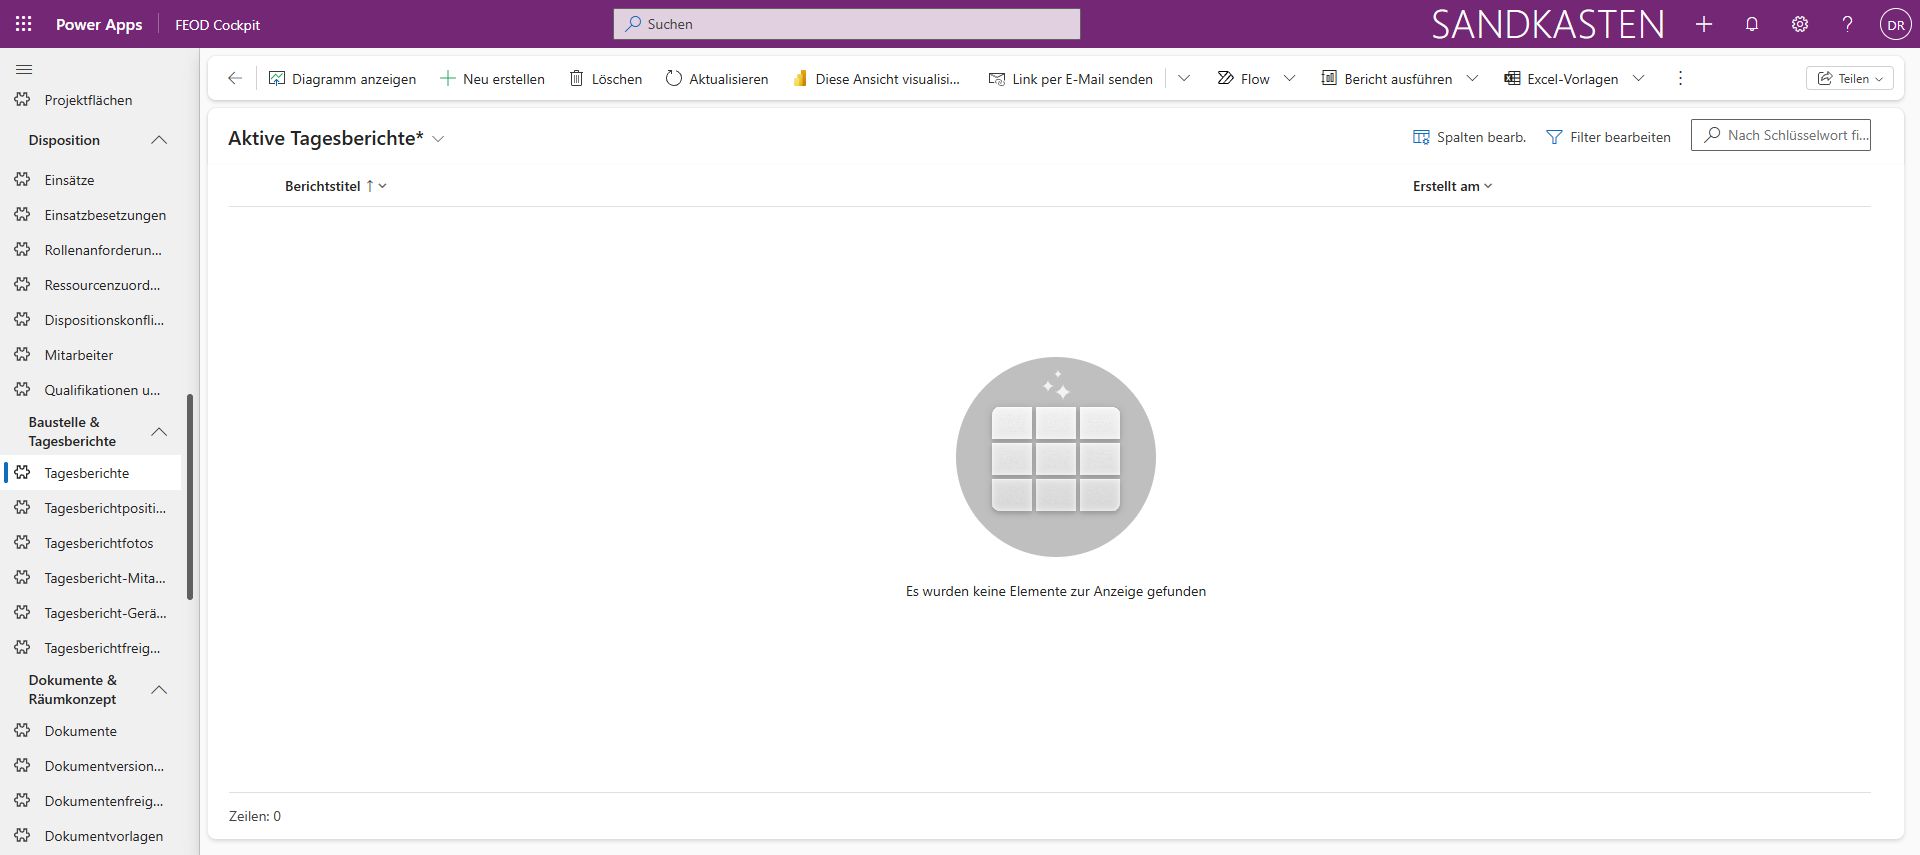
The daily report list is the office's starting point for active reports. It organises entries by report title and creation date. Anyone following up a matter first sees a manageable list before opening the contents of an individual report.
This overview serves a different purpose from the wizard on site: it helps staff find reports and place them in time. The creation date distinguishes entries, while the report title identifies the corresponding documentation. Data entry itself remains in the dedicated report views.
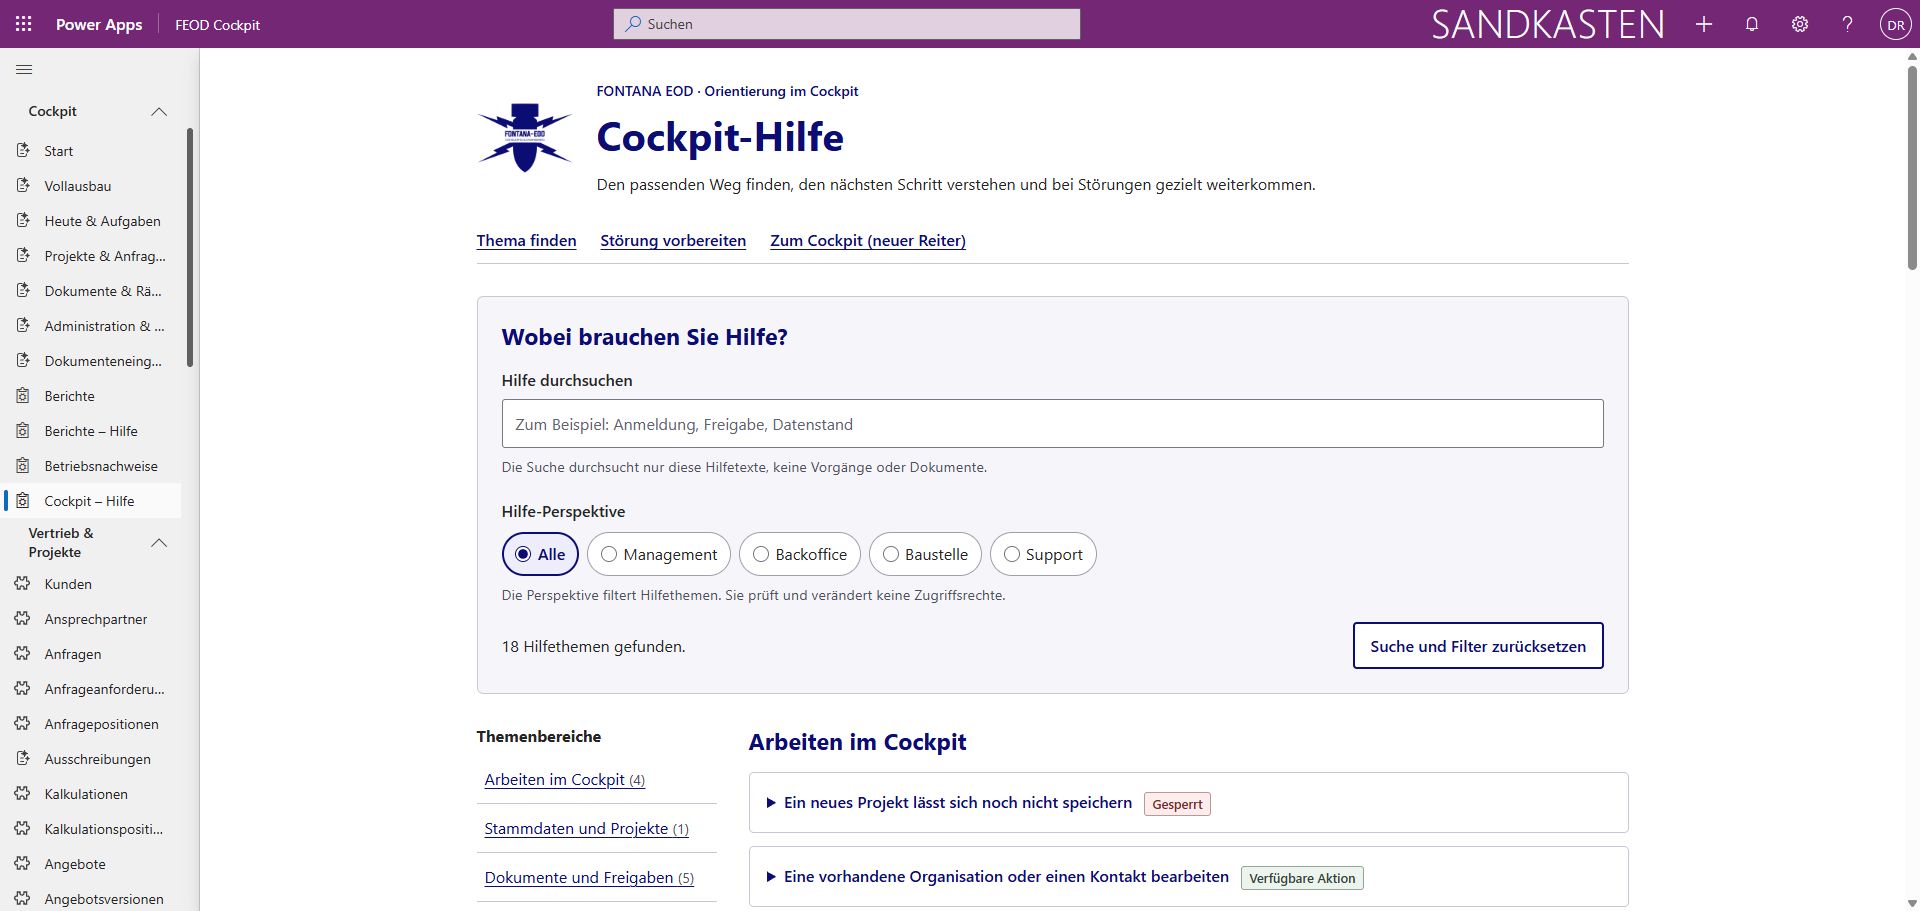
Cockpit Help can be searched and filtered by perspective and topic. Staff with a question about using the platform can start with a search term or their own area of work. The selection guides them through the available help topics rather than a specialist data-entry form.
Reset search and filters restores the open starting view if the selection has become too narrow. Help therefore lets staff look things up within the work environment. It supports the actual work, while tasks, daily reports and planning remain in their own dedicated views.
The plan is to assign emails, telephone notes and supplied project documents to an enquiry. These include contacts, project location, the service requested, dates and attachments. Missing information is intended to appear as specific follow-up questions in the record.
A shared deadline overview has already been created as a partial function. It is intended to show when a reply or quotation is needed and who is handling the matter. Follow-up reminders and telephone notes stay with the same record. A confirmed commission is then intended to generate the associated project file.
AI assistance: The plan is to pre-structure information from incoming documents and suggest matching projects. Staff should be able to read the relevant source passages and confirm the assignment.
The tender area is intended to bring relevant notices and their original documents together. A tender involves more than a heading: deadlines, required evidence, the bill of quantities, queries and revised documents must be reviewed together.
The plan is to assign documents to the correct procurement process, record requirements and queries, and prepare for the later creation of a project. Revised documents should remain identifiable by their version. This helps staff decide which services and supporting records are needed to prepare the bid.
A quotation should be able to include several services from the descriptive catalogue as well as freely entered items. This combined item-entry process has already been tested as a partial function. Project-specific quantities, units and estimating details are added and checked during preparation.
The wider scope includes the original cost estimate, cost scenarios, variations, procurement and preparation of records of work performed. Planned and actual labour, equipment, material and subcontracted services are intended to be comparable. Changes to the agreed scope remain traceable within the project.
Responsible staff should be able to organise services, check their contractual basis and completeness, and pass confirmed information on for further processing with a clear record. Queries and approvals are part of this technical workflow.
The personnel area includes the master data, qualifications, certificates of competence, instruction records and availability needed for operations. These are to be maintained so that the scheduling team can check the relevant requirements and their validity for a particular task.
Deployment planning should show the qualifications and other prerequisites actually needed. Missing or expired evidence must be taken into account for the task concerned. Absences and existing assignments should help prevent the same person being scheduled in two places at once. The responsible scheduling team makes the staffing decision.
Shared overviews are planned for equipment, vehicles, machinery, attachments and materials. Alongside availability, they cover maintenance, inspection and calibration status, issue and return, and faults. This is intended to show during planning which resources are available for the specific task.
On site, staff should be able to record equipment used, machine hours, consumption and material requirements against the relevant project. Requests for additional resources remain assigned to the deployment. Inspection and calibration status support those responsible when selecting and preparing equipment.
The project file is intended to be the shared reference point for plans, enquiries, reports and other documents. A site plan must belong to the correct project; when a file is revised, the new version must remain distinguishable from the previous one. Original documents should retain their provenance and project reference.
The Cockpit is intended to provide access to the associated project folder and its subfolders. Authorised staff should be able to find and open documents, then work on them within the appropriate process. Documents should be selected and handed over deliberately, based on their actual processing status.
This is particularly useful for queries: a note about a missing document should refer to a specific matter and document version. The office and site team should then be able to discuss the same task. The information that belongs together is explained in our Project process.
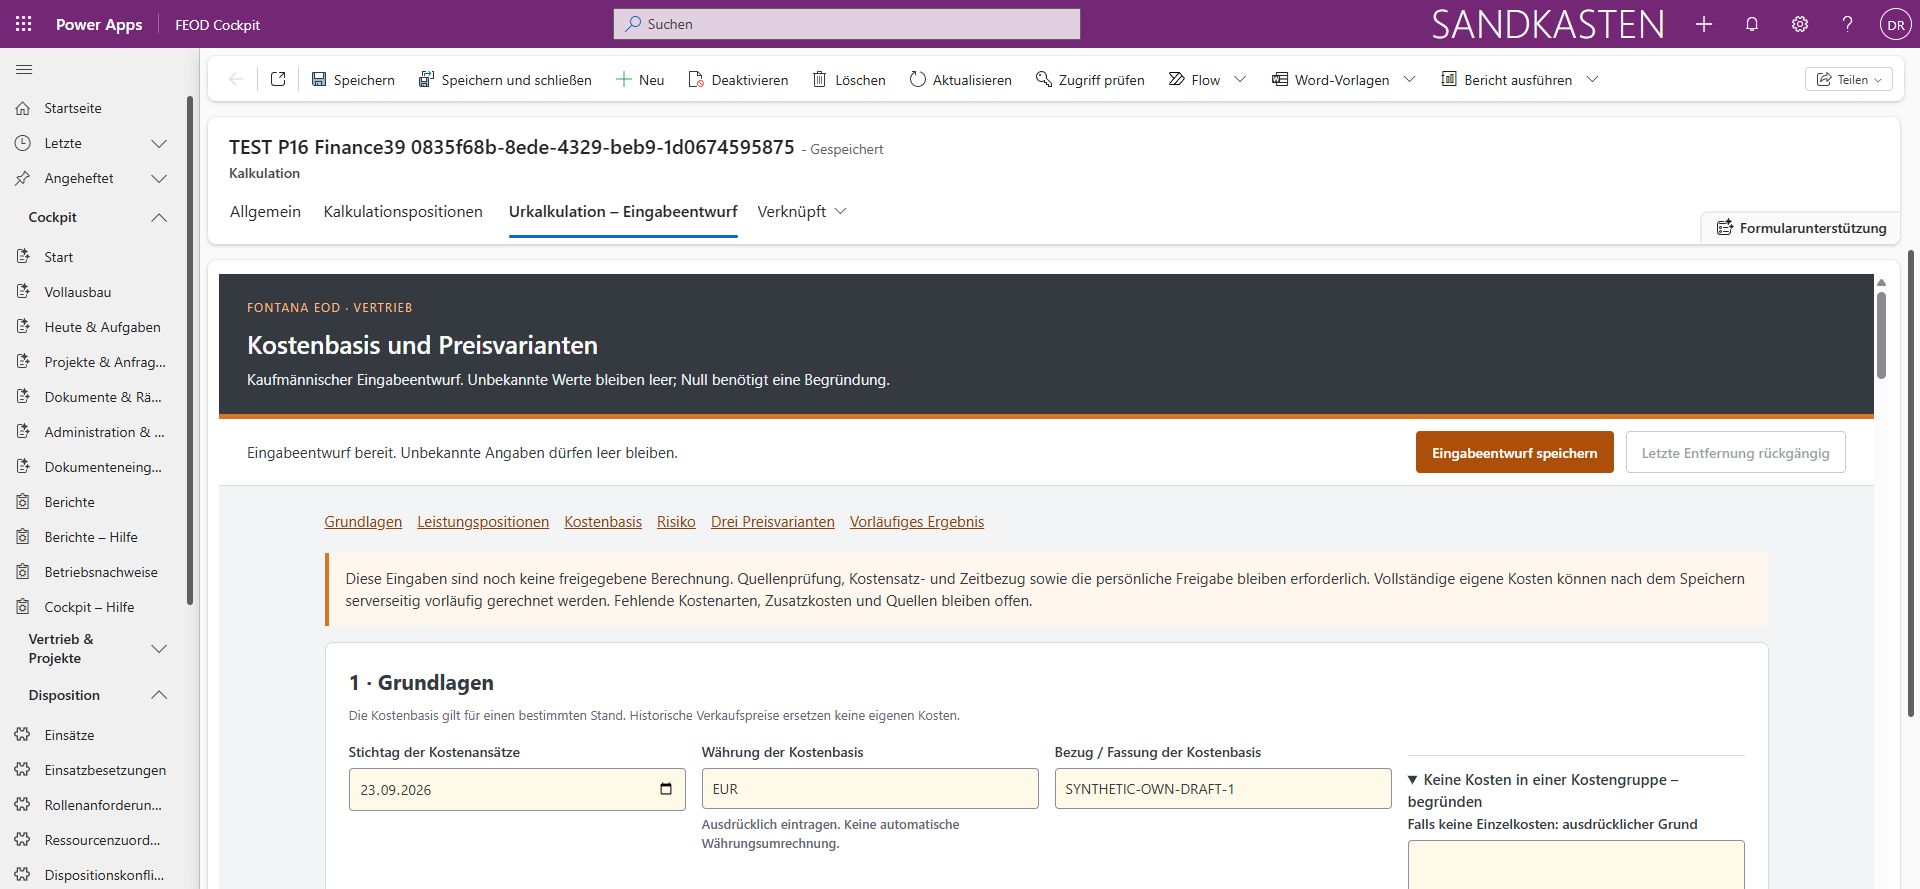
The embedded workspace opens the cost basis within the estimate record. A shared section menu gives the user access to the basic settings, service items, cost basis, risk allowance and pricing options. The basic settings include the reference date, currency and the name of the cost version used.
This keeps the record connected to its estimating details. Entries can be saved as a draft and continued later. This view opens the same workspace as the detailed cost form; it illustrates its place in the Cockpit using a cost example.
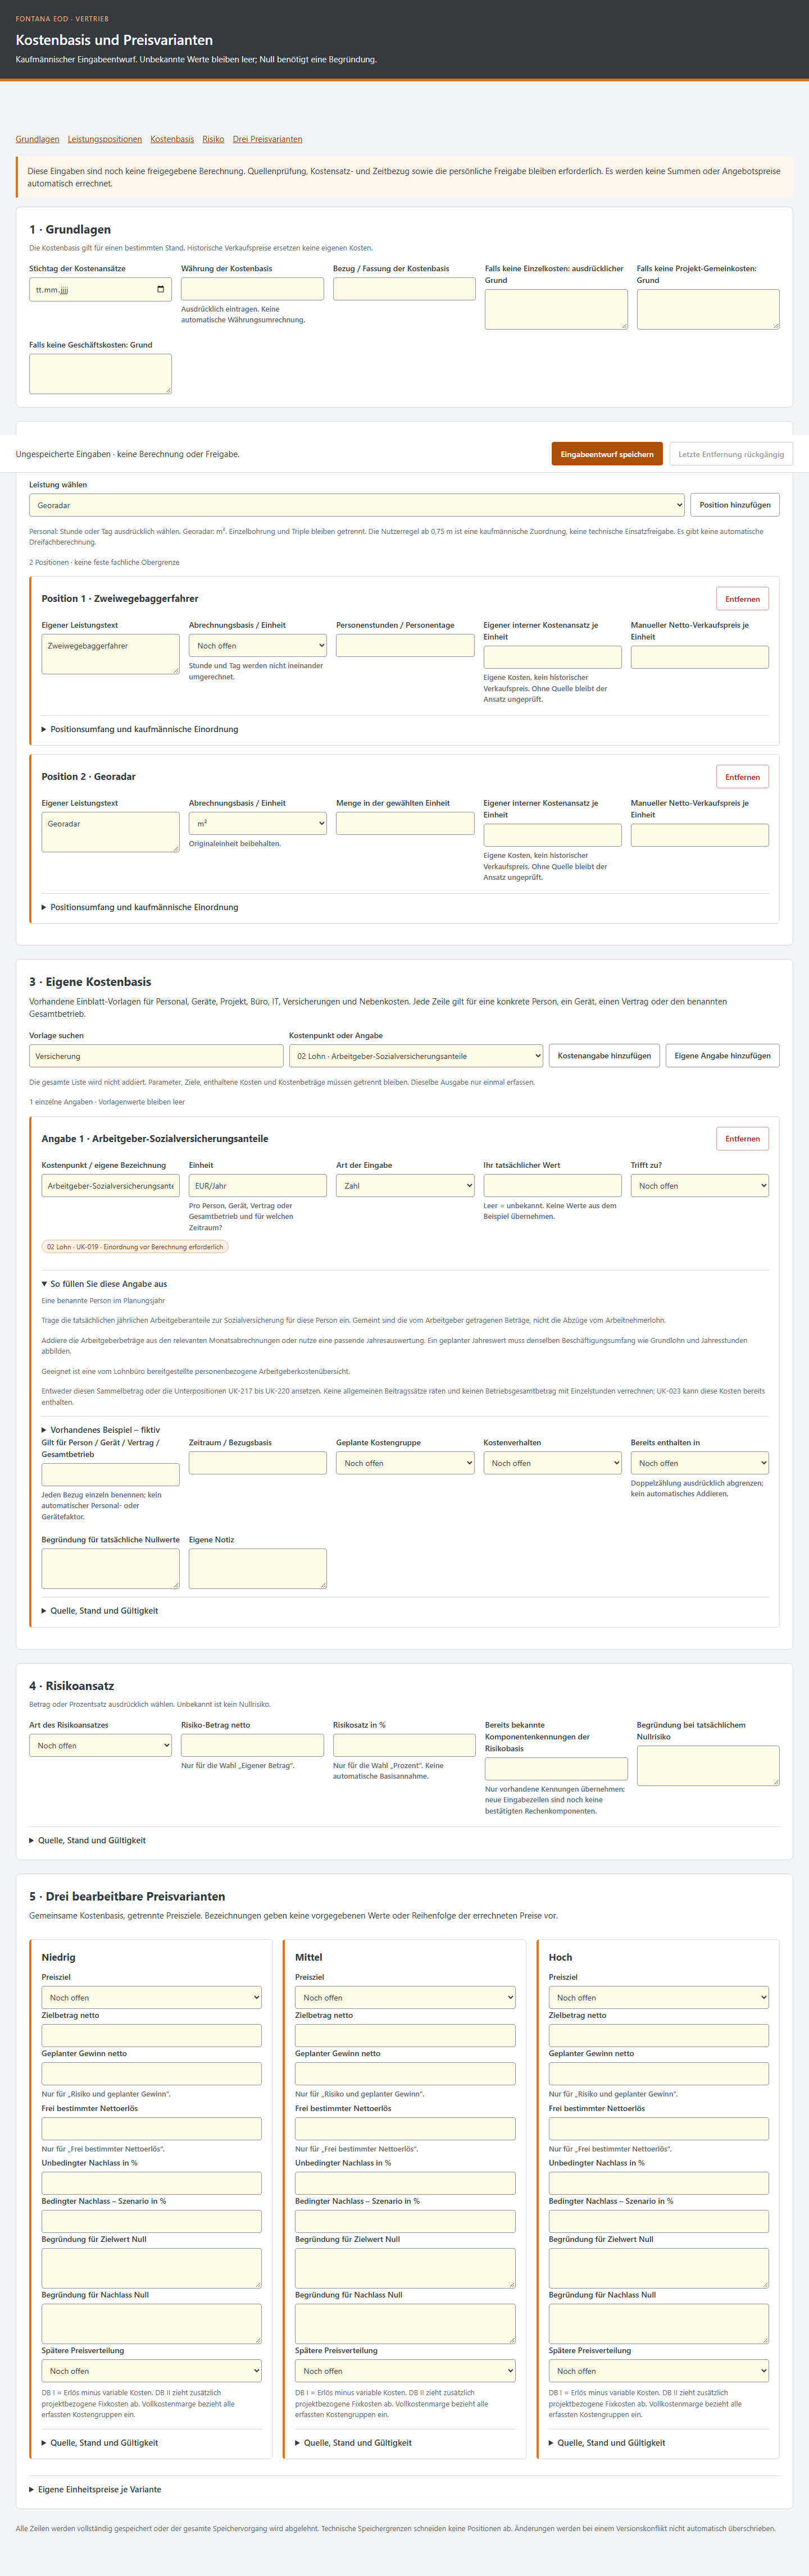
The cost form leads from the basic settings to the provisional result. The user first sets the reference date, currency and reference for the cost basis. They then enter service items and add the associated costs. The section menu provides direct access to the cost basis, risk allowance and pricing options.
This keeps the assumptions behind an estimate together in one place. Missing information can initially remain open and be added later. The cost example illustrates the structure; the saved entries provide the basis for comparing the options.
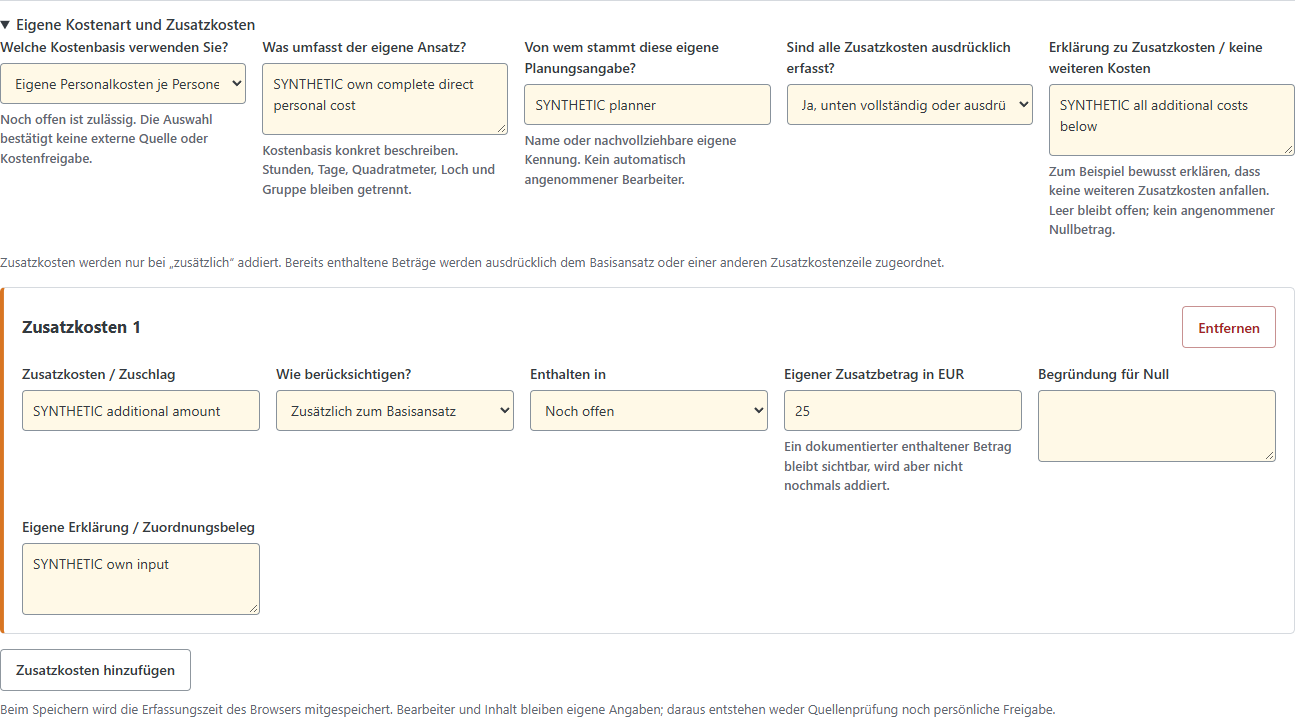
For each item, the user selects the cost basis and describes what their allowance covers. Additional expenses are entered on separate rows with a name, amount and explanation. A selection indicates whether these costs are added to the base rate or already included in it.
This makes it possible to see later how an allowance is made up. Amounts already included are assigned to an existing cost item rather than added again. Further rows can be added or removed. The example shows the input structure using synthetic figures.
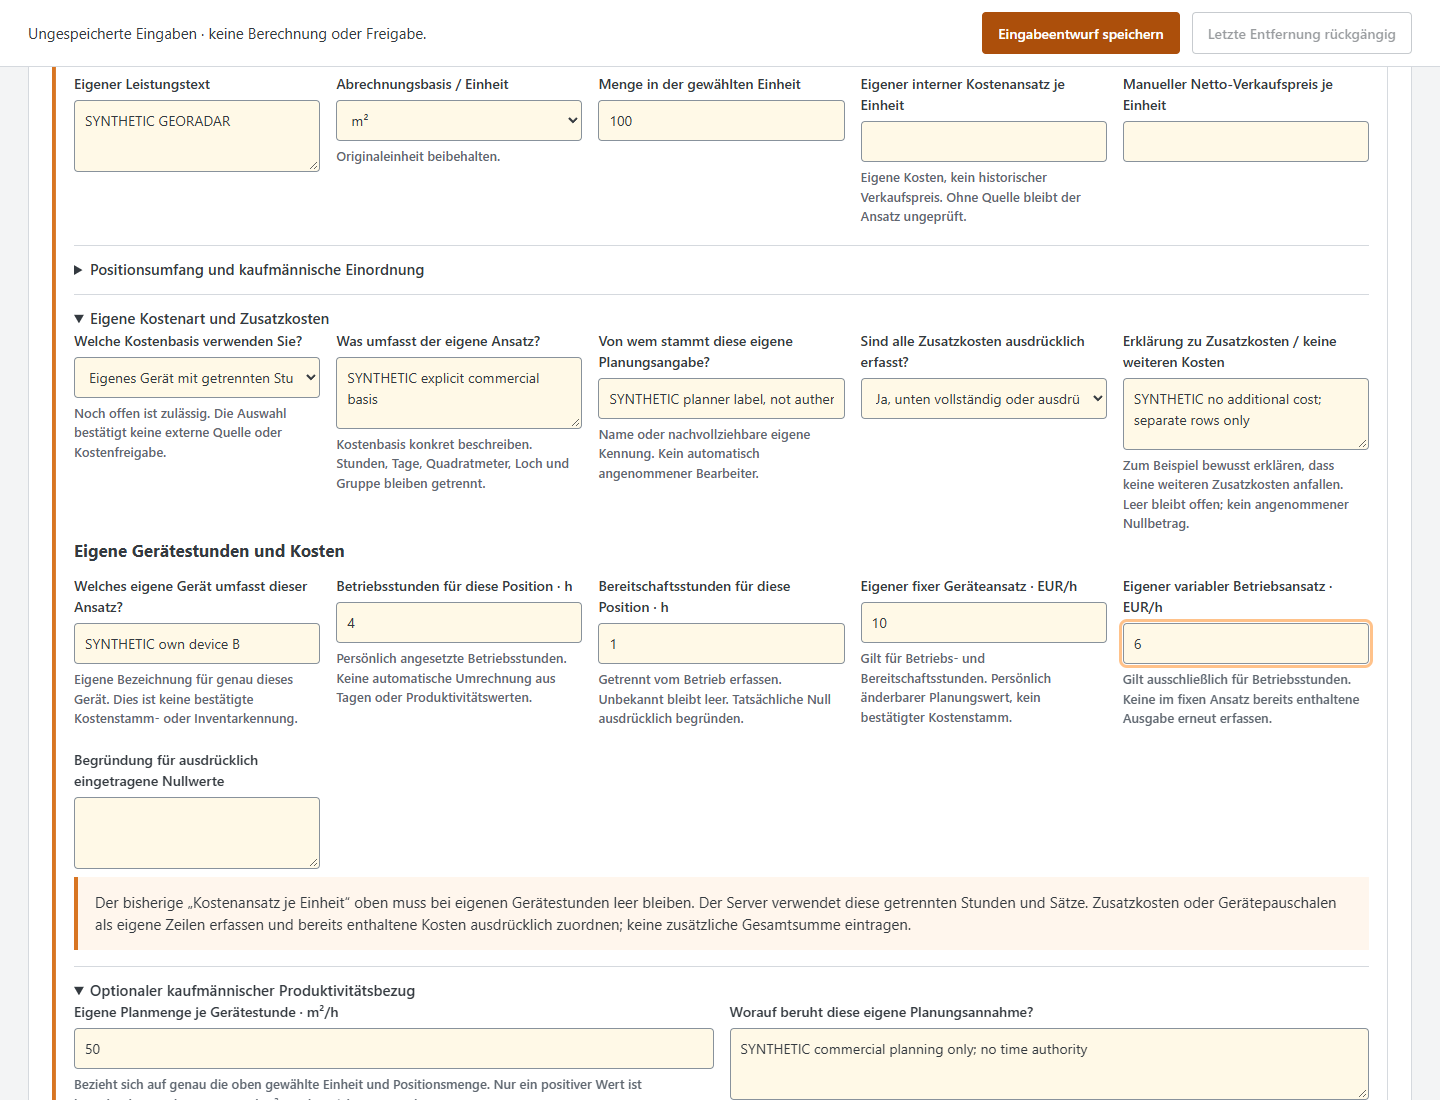
For in-house equipment, the user first describes which machine or equipment their allowance covers. Operating hours and standby hours are then entered separately. The fixed equipment rate and variable operating rate have their own fields; the quantity of work and its unit remain visible at the top of the item.
This separation makes the cost allowance easier to understand: standby and actual operation are not combined into a single figure. A planned quantity per equipment hour can also be recorded with its basis. The cost example explains these entries; it does not prescribe operating time or output.
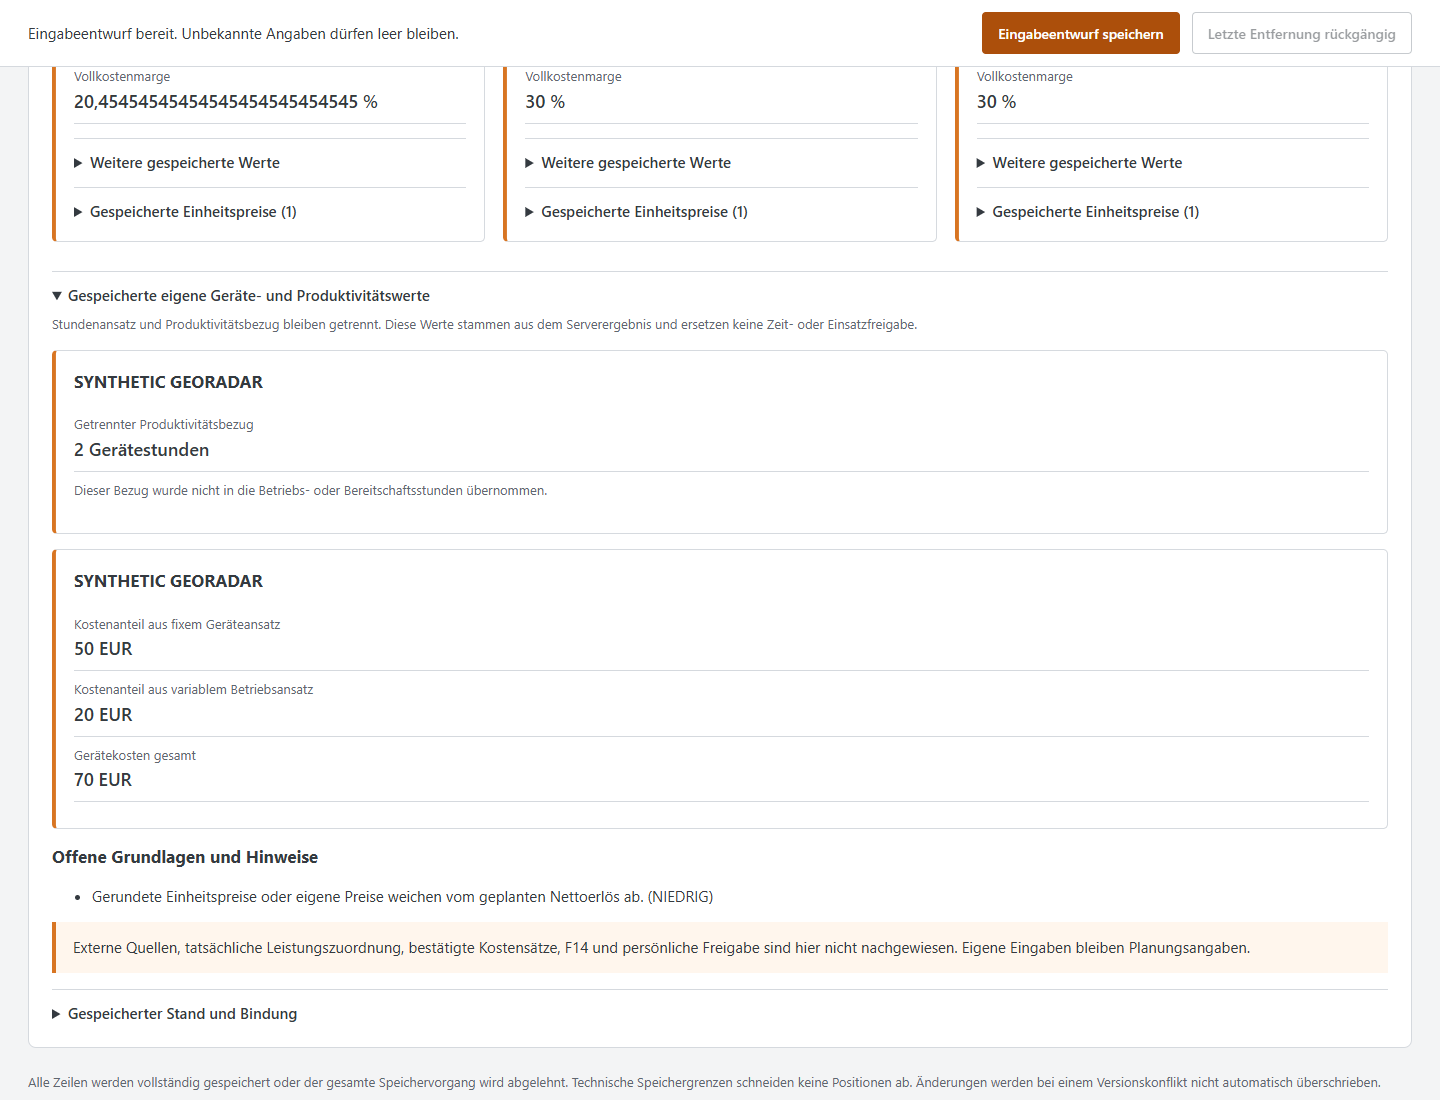
The results view brings the saved equipment details together clearly. It shows the cost attributable to the fixed equipment rate, the variable operating rate and the total equipment cost. A separate area contains the recorded productivity basis.
The user can therefore see which information contributed to the equipment allowance without reopening every input field. The productivity basis remains separate from the recorded operating and standby hours. The synthetic example makes this distinction visible and helps with checks before further quotation work.
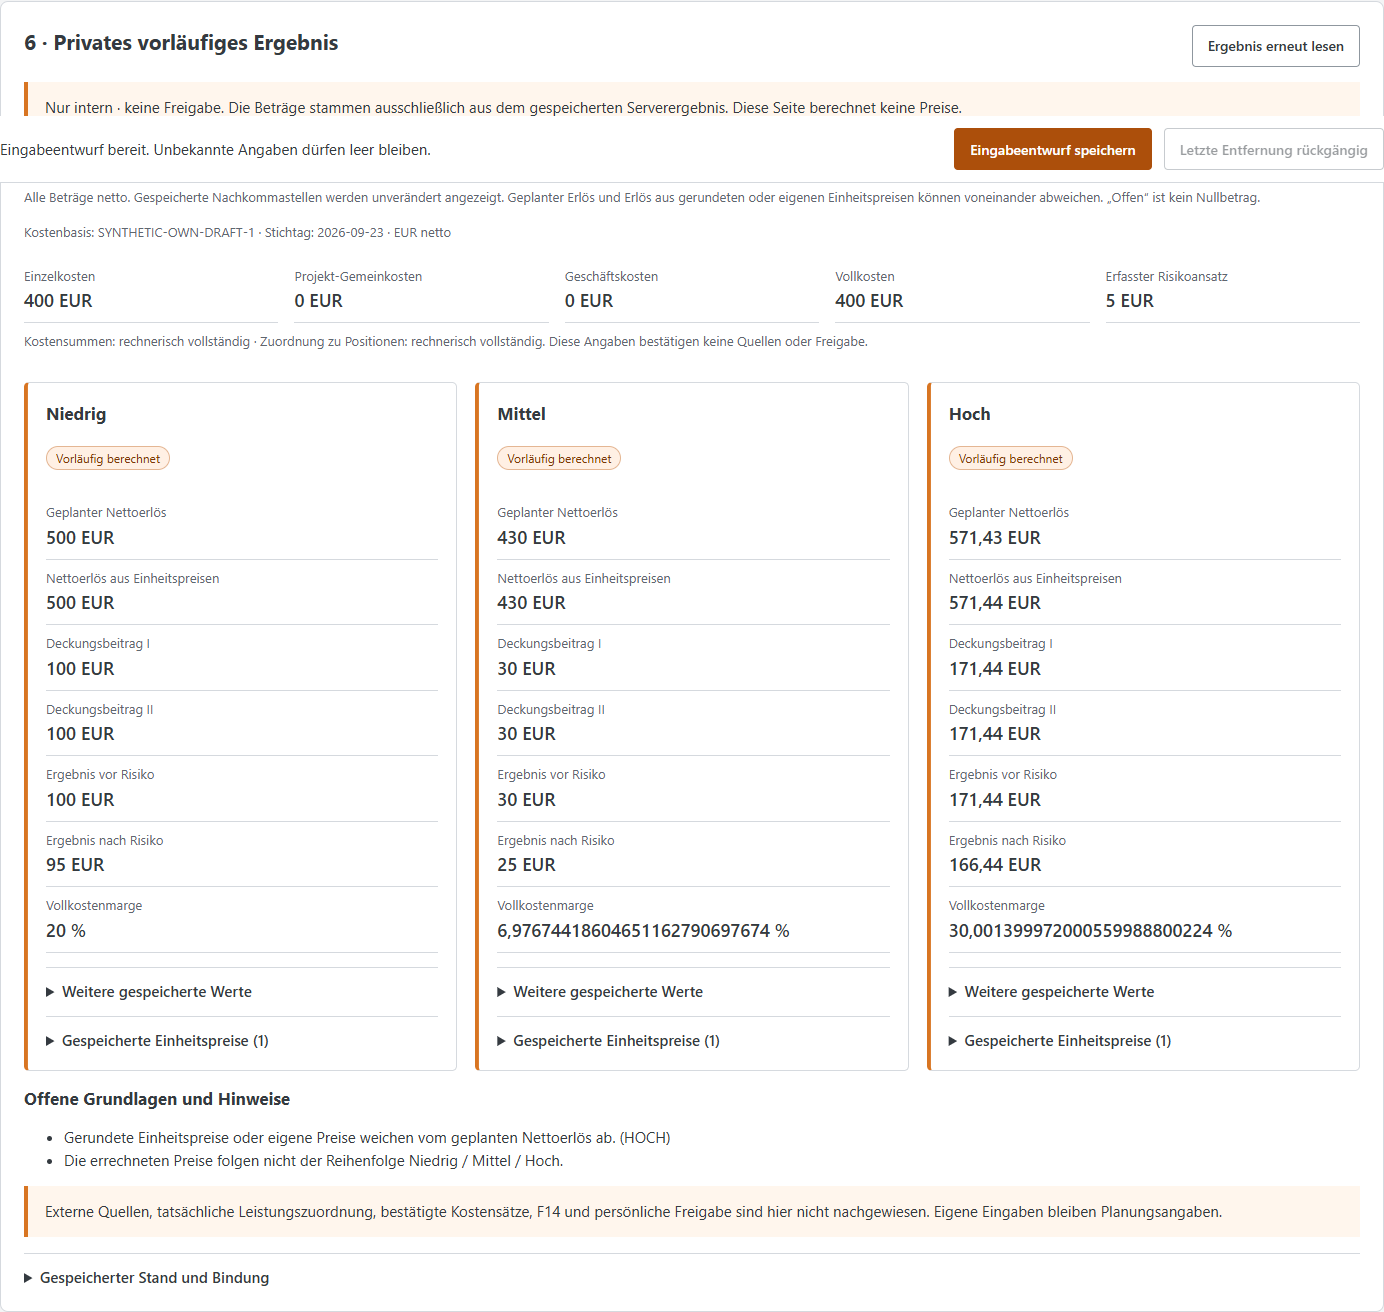
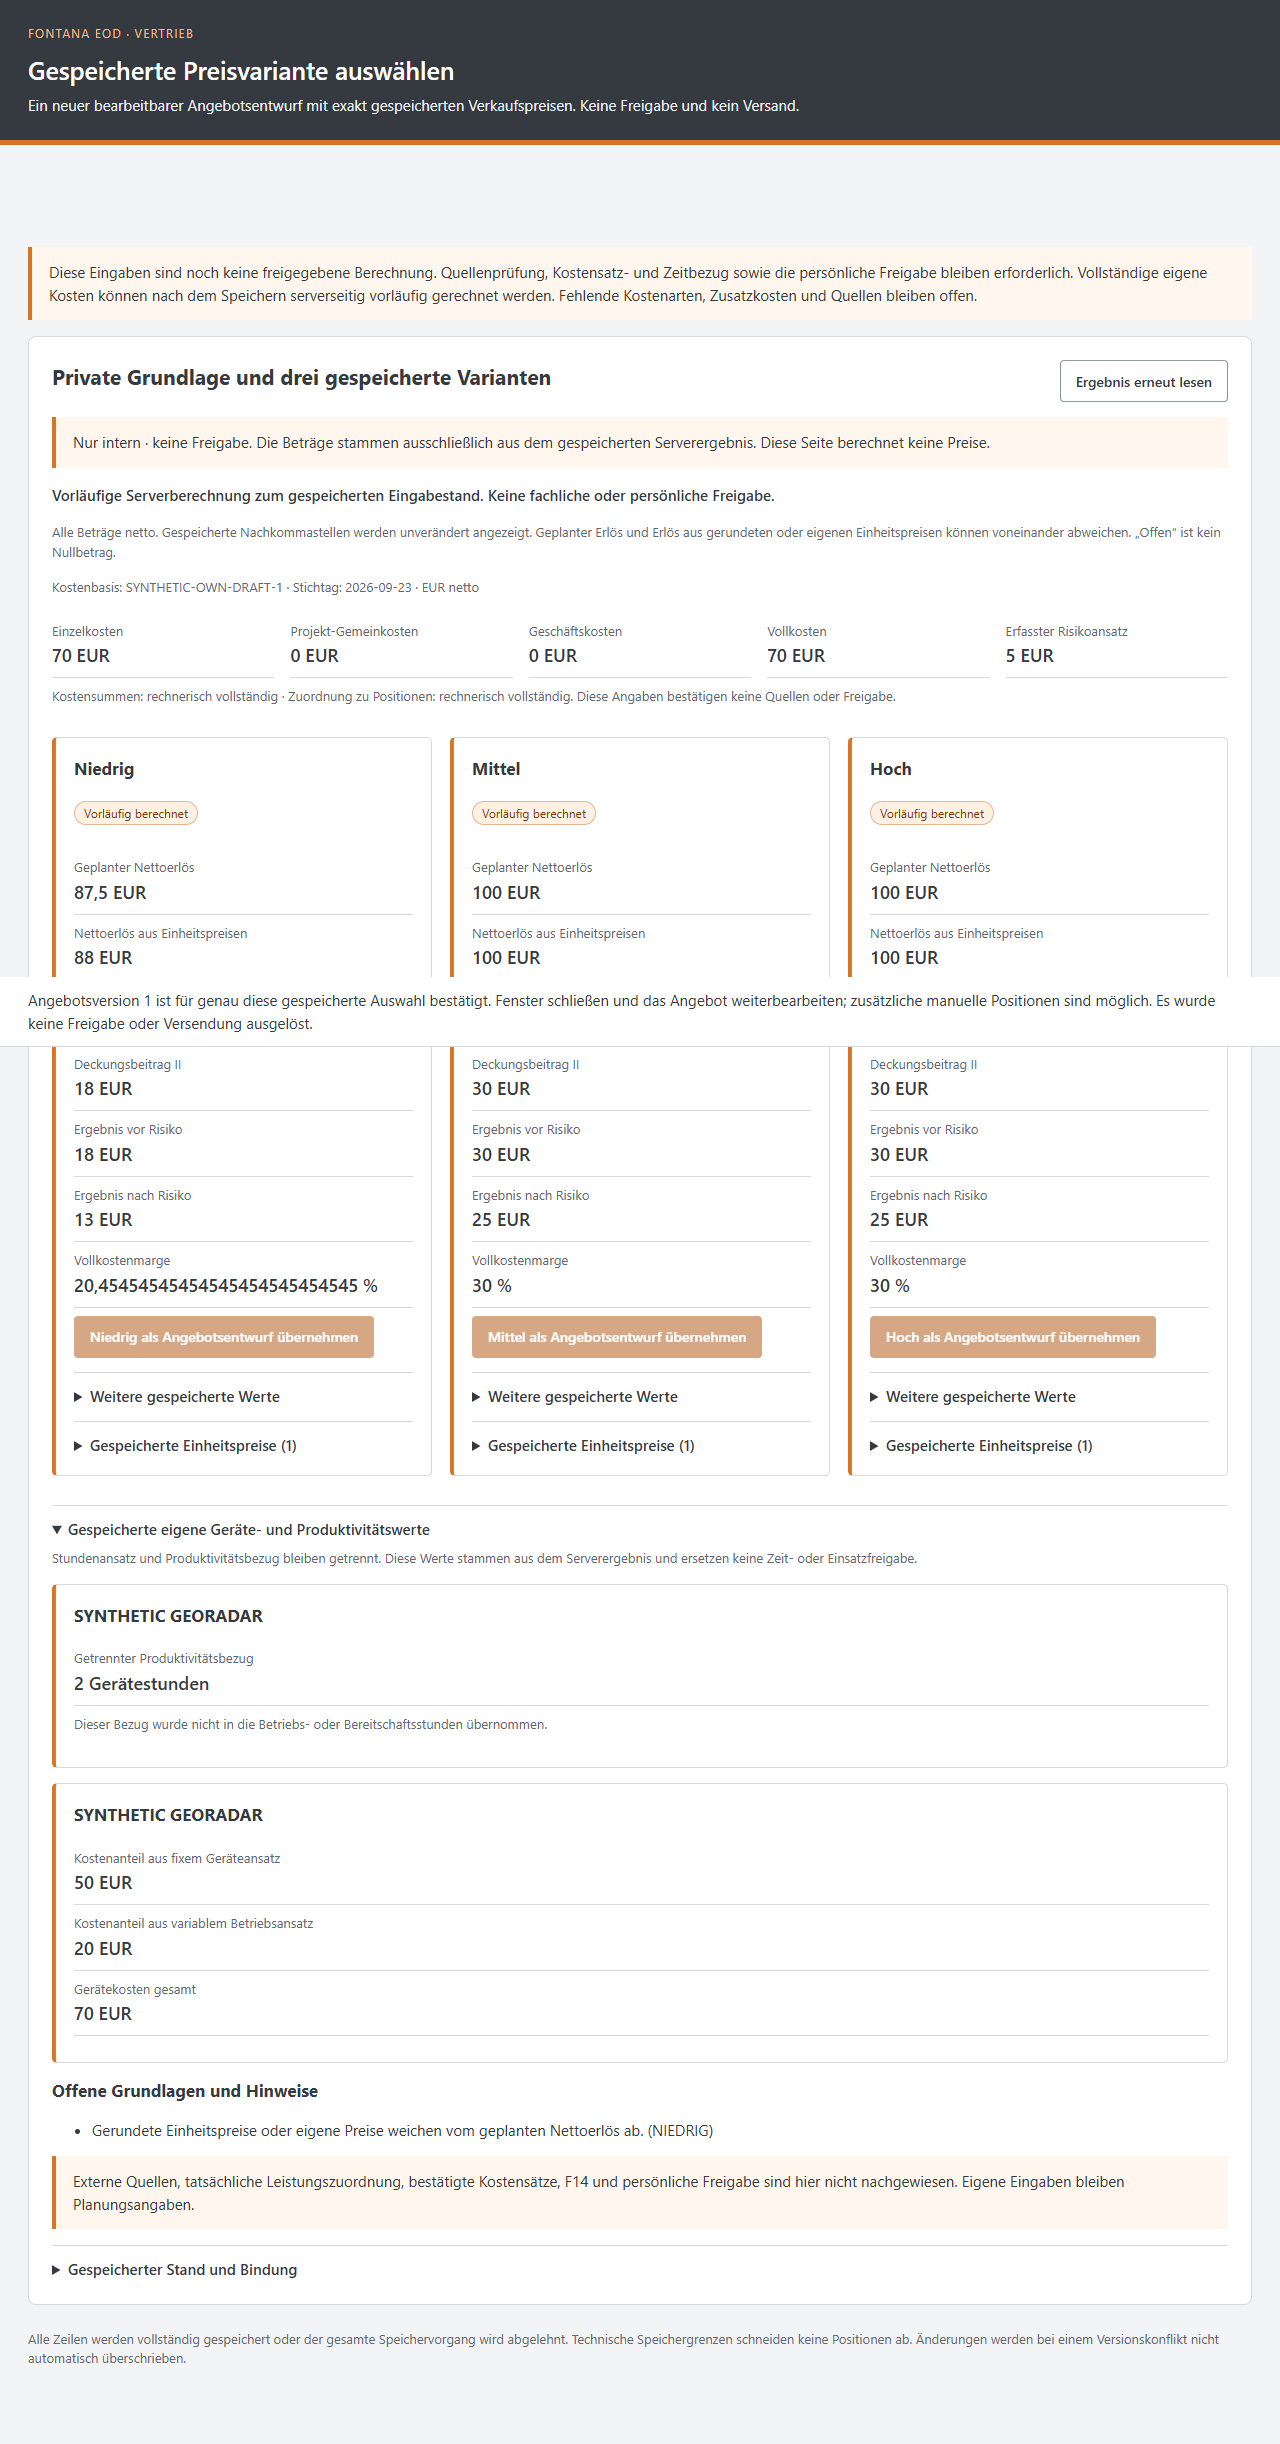
The options view shows the saved cost basis alongside the three Low, Medium and High approaches. Each option displays planned net revenue, revenue from unit prices, contribution margins, and the result before and after the risk allowance. Other saved figures and unit prices can be expanded.
The user can check differences directly instead of gathering individual figures from several views. Differences between planned revenue and rounded unit prices are also visible. The amounts shown belong to a cost example; choosing an appropriate basis for the quotation remains a deliberate step.
After comparing the saved options, the user selects the approach they wish to develop further. Each option has its own transfer function. Alongside revenue, the view provides results and saved unit prices so that the choice relates to the specific saved version.
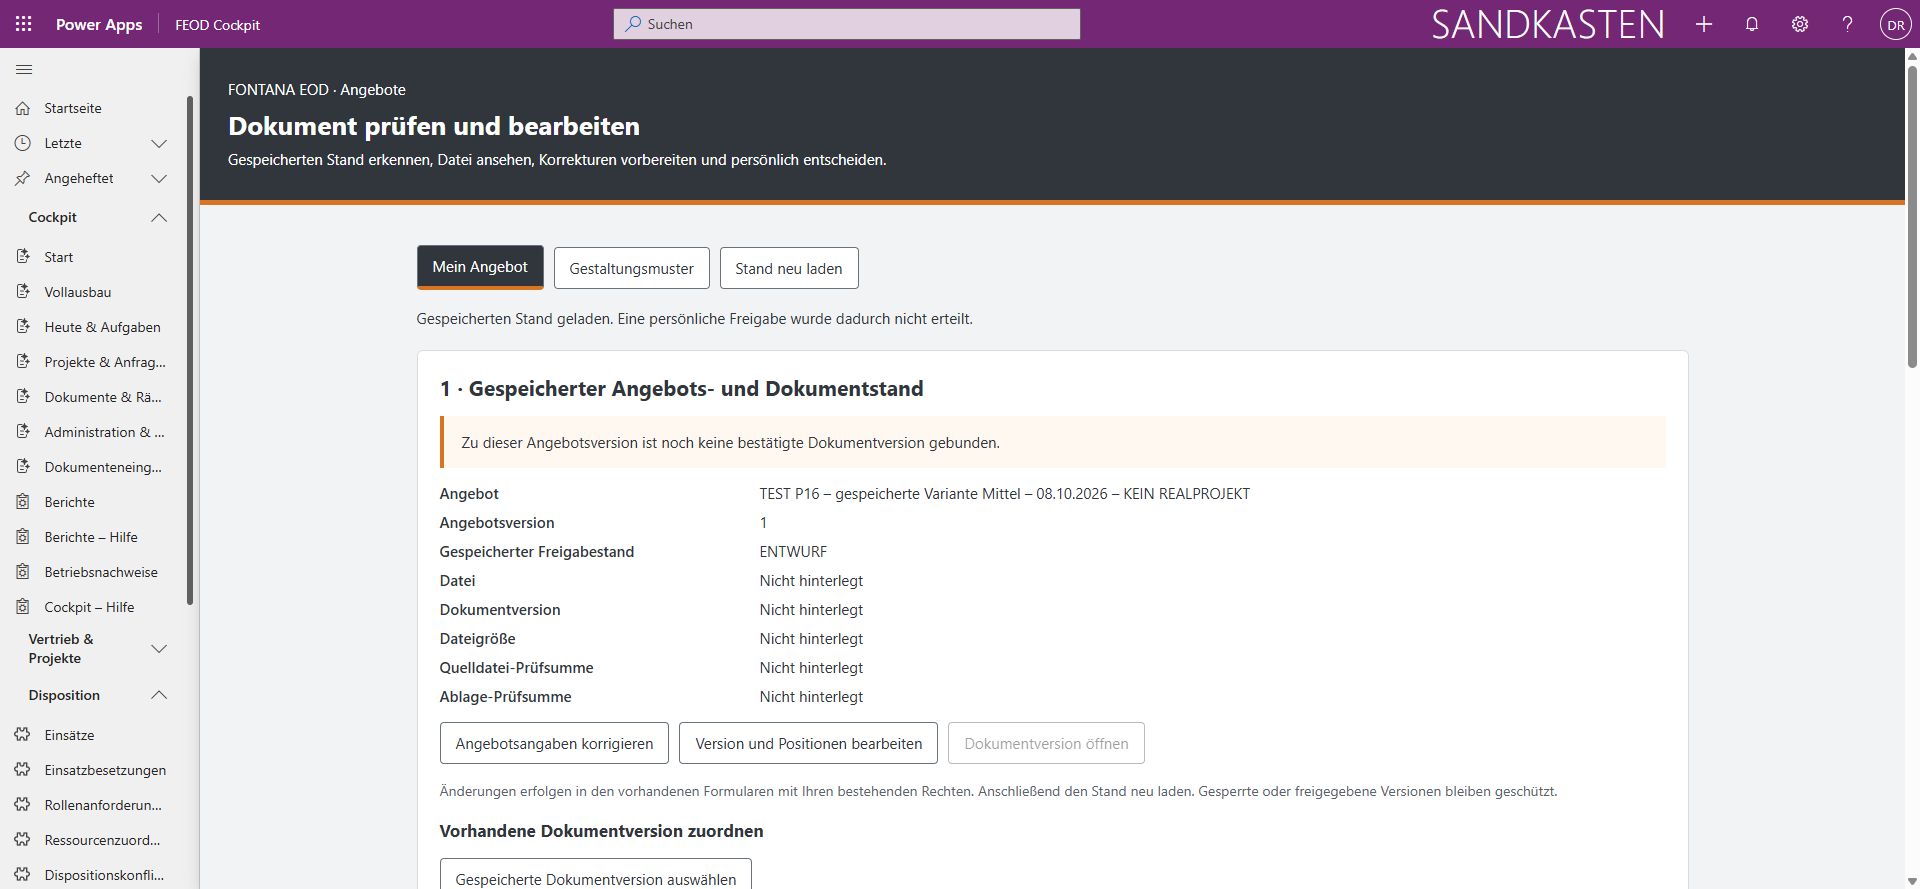
The selected option becomes an editable quotation draft. Quotation details and additional manual items can then be developed further. The confirmation shown belongs to a synthetic quotation example. Transferring the option replaces neither personal review of the quotation nor a separate sending step.
The quotation view shows the saved status, quotation version, approval status and details of the associated file. The user can see whether a document version is already stored. Dedicated functions allow them to correct quotation details or continue editing the version and items.
An existing document version can be assigned specifically to the quotation draft. This keeps the commercial status clearly connected to its document. The quotation example shown does not yet have a confirmed file stored. The view supports preparation and checking before a document is personally approved and passed on.
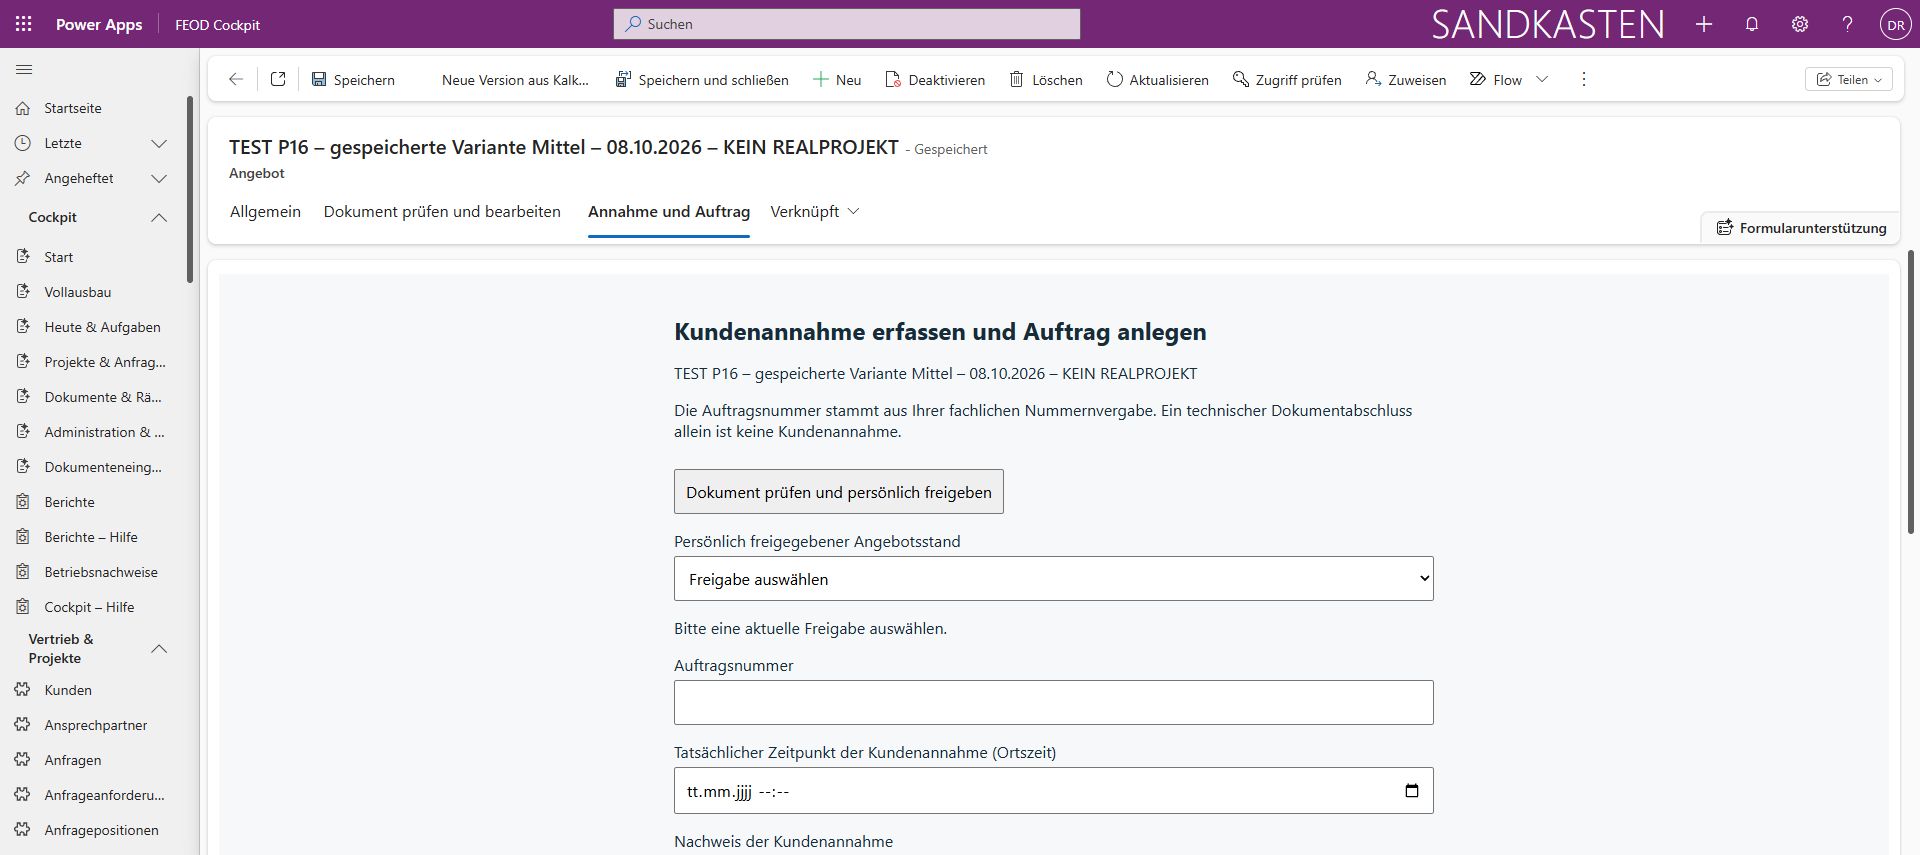
In the Acceptance and Order area, the user selects the personally approved quotation version. They enter the assigned order number and the actual time of customer acceptance. The associated evidence is intended to form a separate part of the record.
This preserves a clear record of which quotation was accepted and when. A dedicated function provides access to document review and personal approval. The editing view shown contains a quotation example; opening the form alone does not create a confirmed customer order.
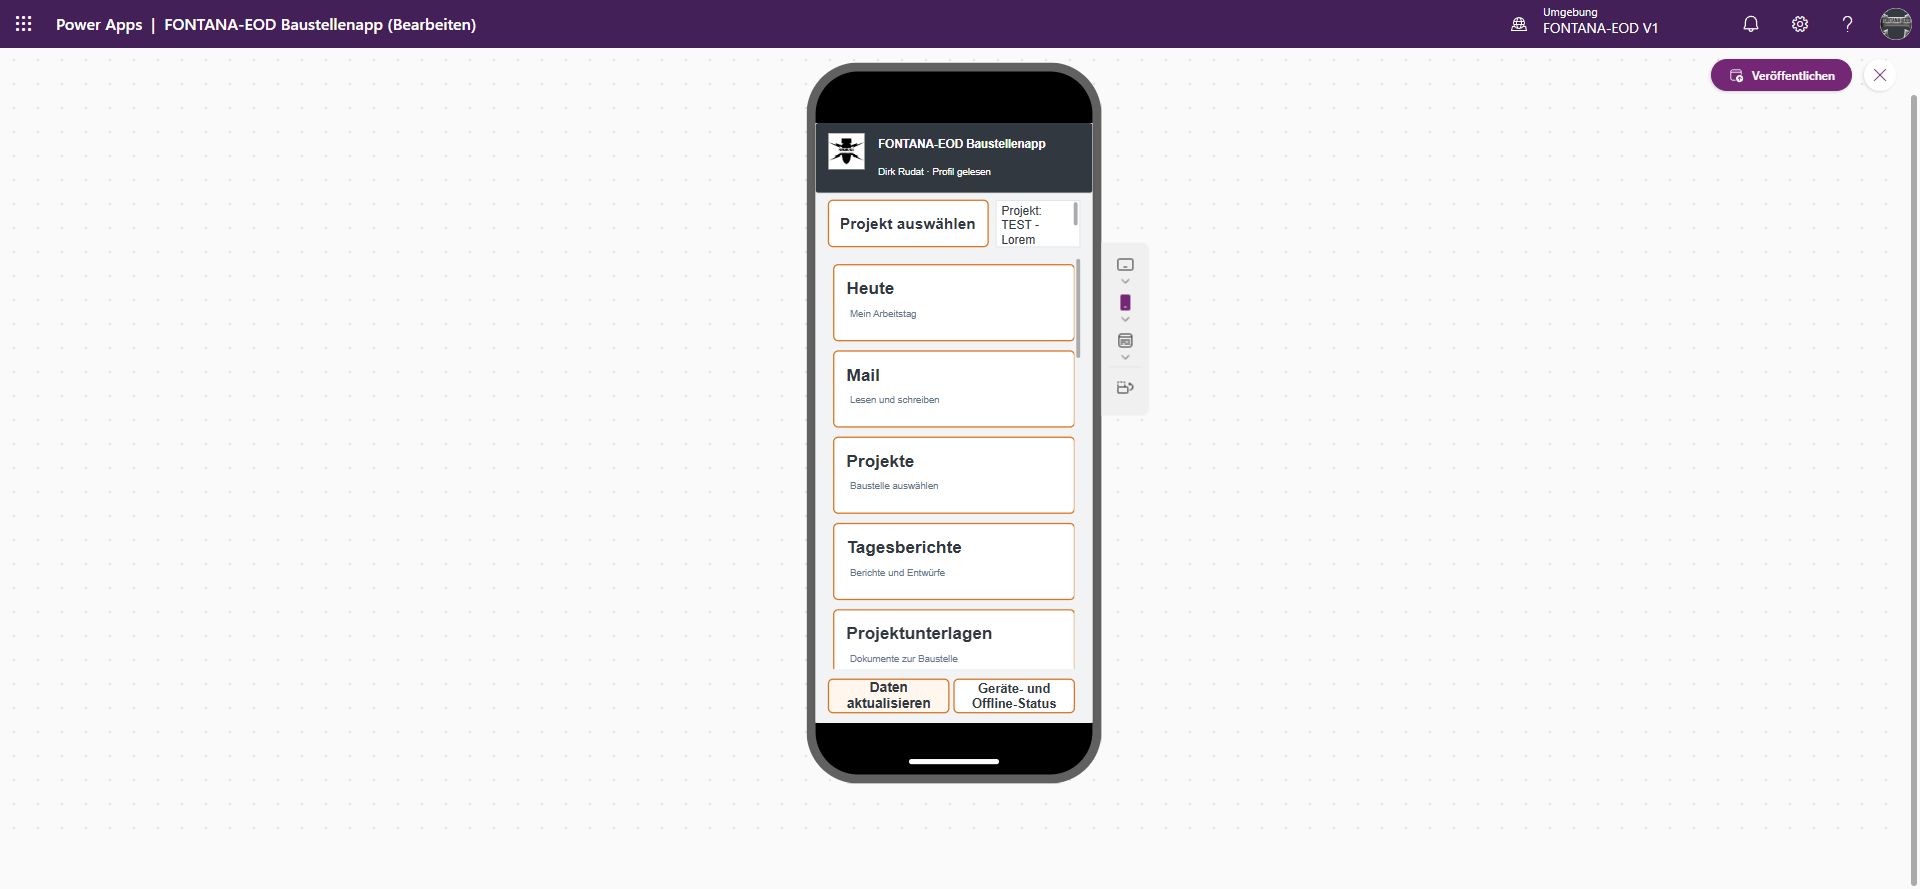
The home screen brings together the access points needed on the move: project selection, the Today view, projects, daily reports and project documents. Email access is also located here. Instead of starting in a different place for every task, users first go to the relevant work area.
Refresh data and the device and offline status are accessible directly from the home screen. This helps users orient themselves before retrieving information or entering details. Project selection establishes the work context; the other areas then lead to documents or the report for the relevant deployment.
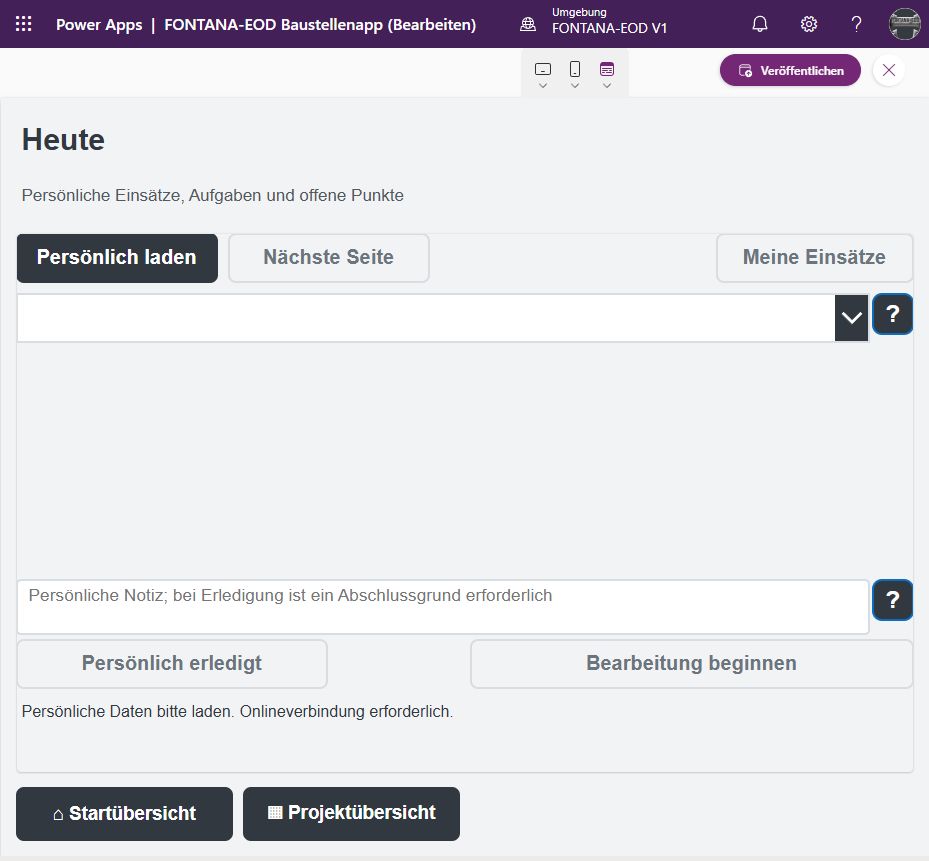
The Today view brings together tasks for the user's working day. Load personal entries retrieves the accessible records; My deployments opens the associated deployment overview. Work therefore starts with the tasks assigned to the person signed in.
A personal note can be added to a selected entry. Start work and Personally completed distinguish work in progress from completion. A completion reason is provided for closing a task. The note therefore stays connected to the relevant task.
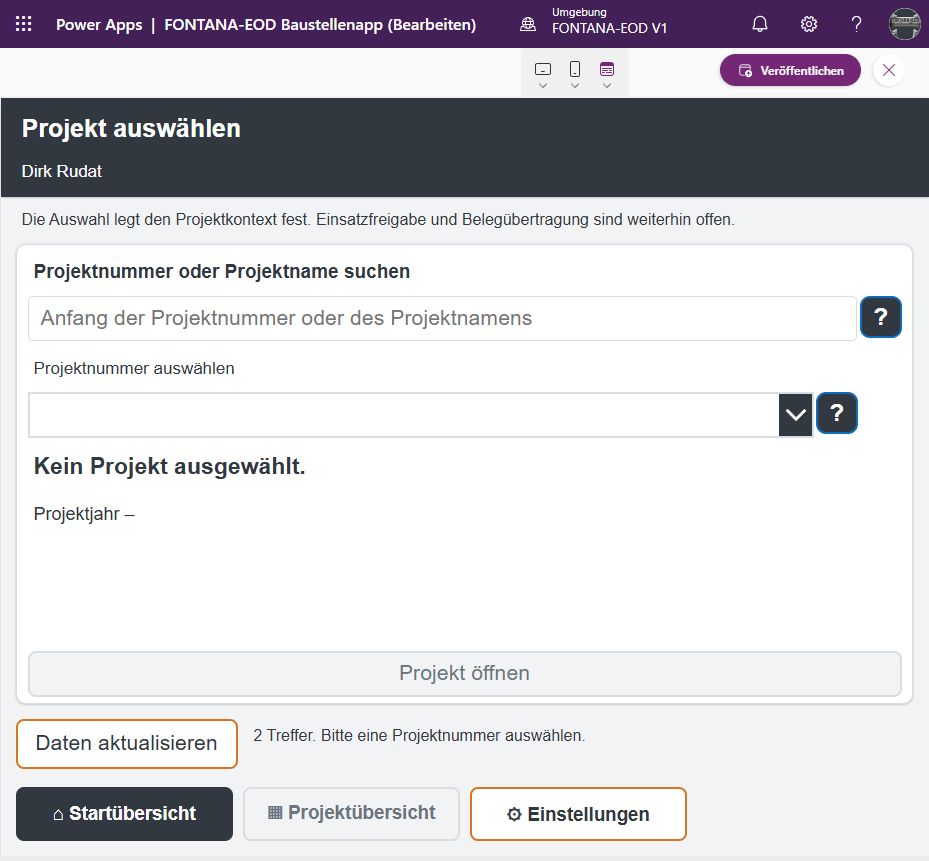
Project selection is the starting point for project-related work. Search by project name or number, select the correct result, then open the project: this sequence helps assign reports and documents to the right project.
The view shows the current selection and allows users to refresh the available projects. The project context remains visible during subsequent work. This is particularly important when staff work on several sites within a short period.
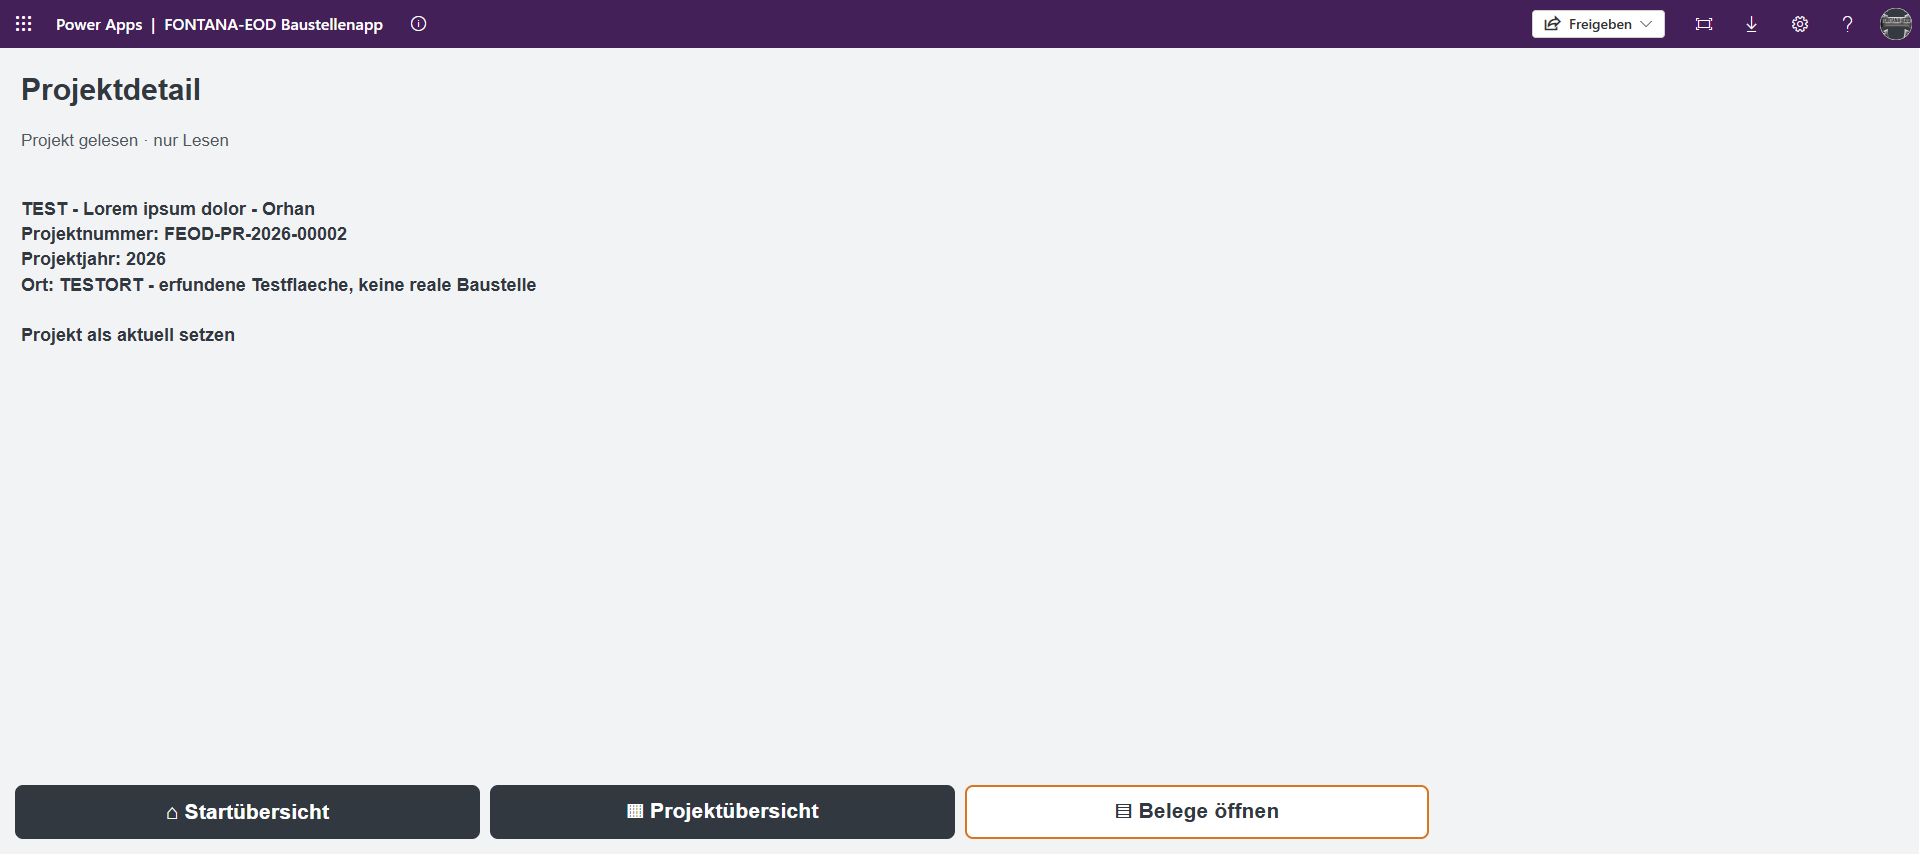
The project details page shows the project's basic identifiers: name, project number, project year and location. It is a reference view. These details help users check that they have selected the intended project before moving on to other documents.
Visible access points lead back to the home overview, the project overview and supporting records. Set as current project makes this project the context for subsequent work. The page therefore combines orientation with access to the associated information, rather than placing a large data-entry form on a small screen.
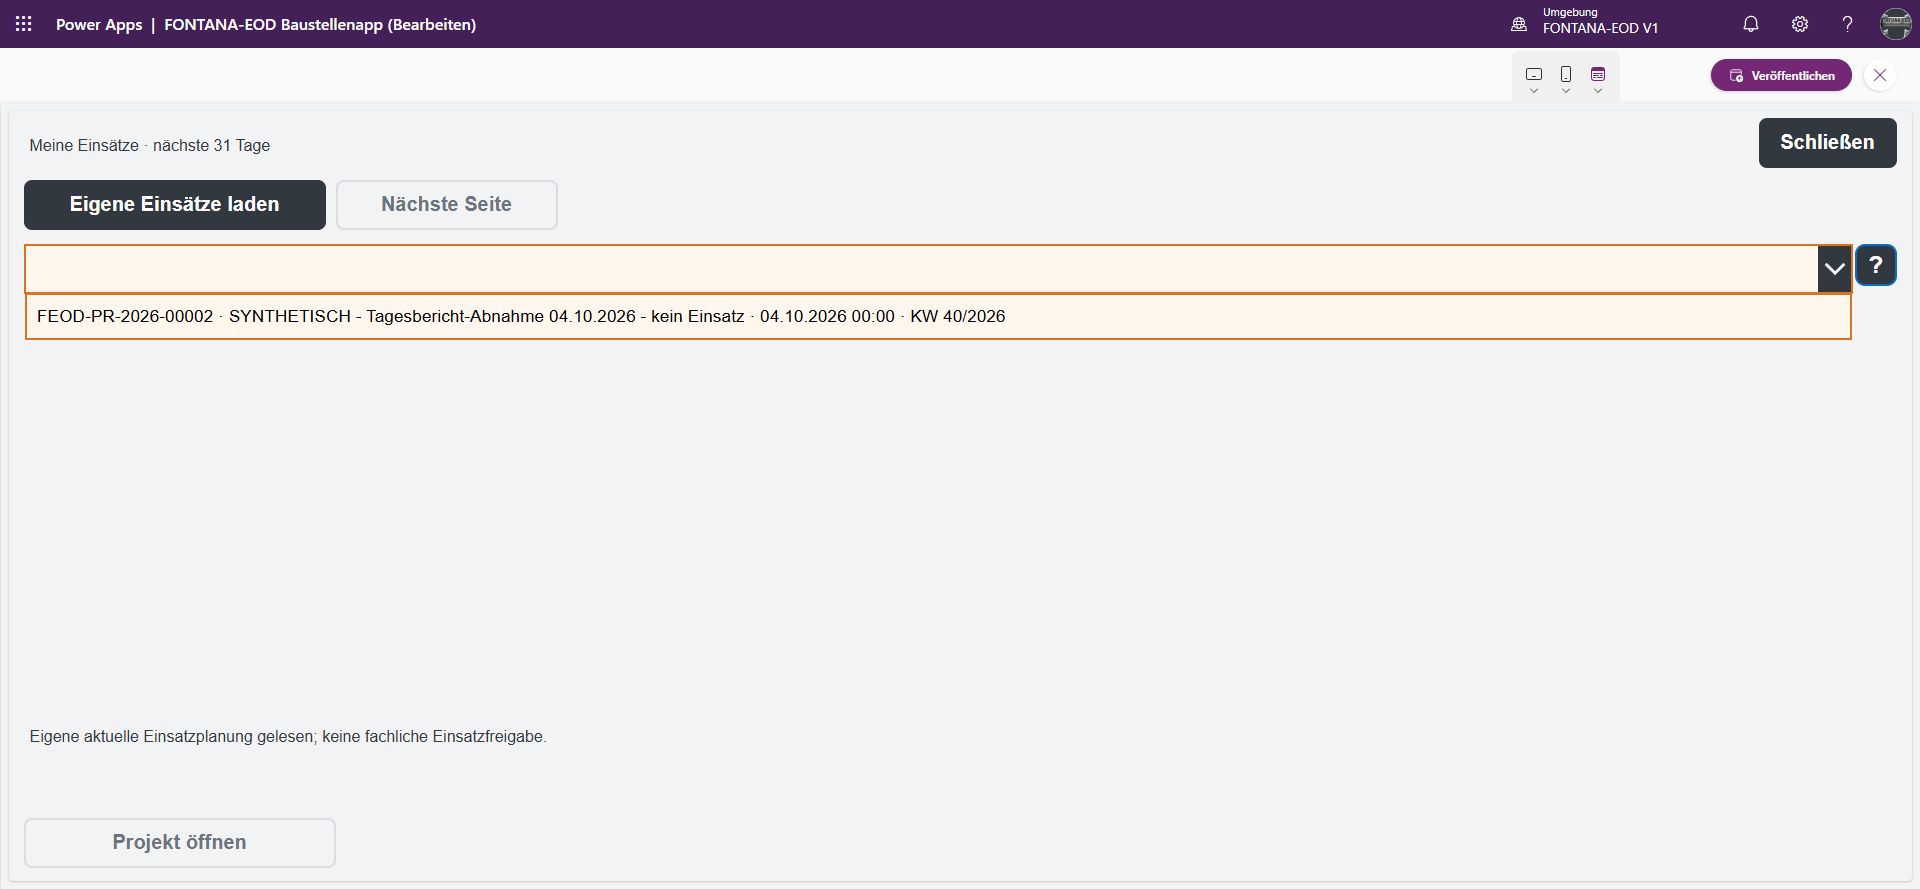
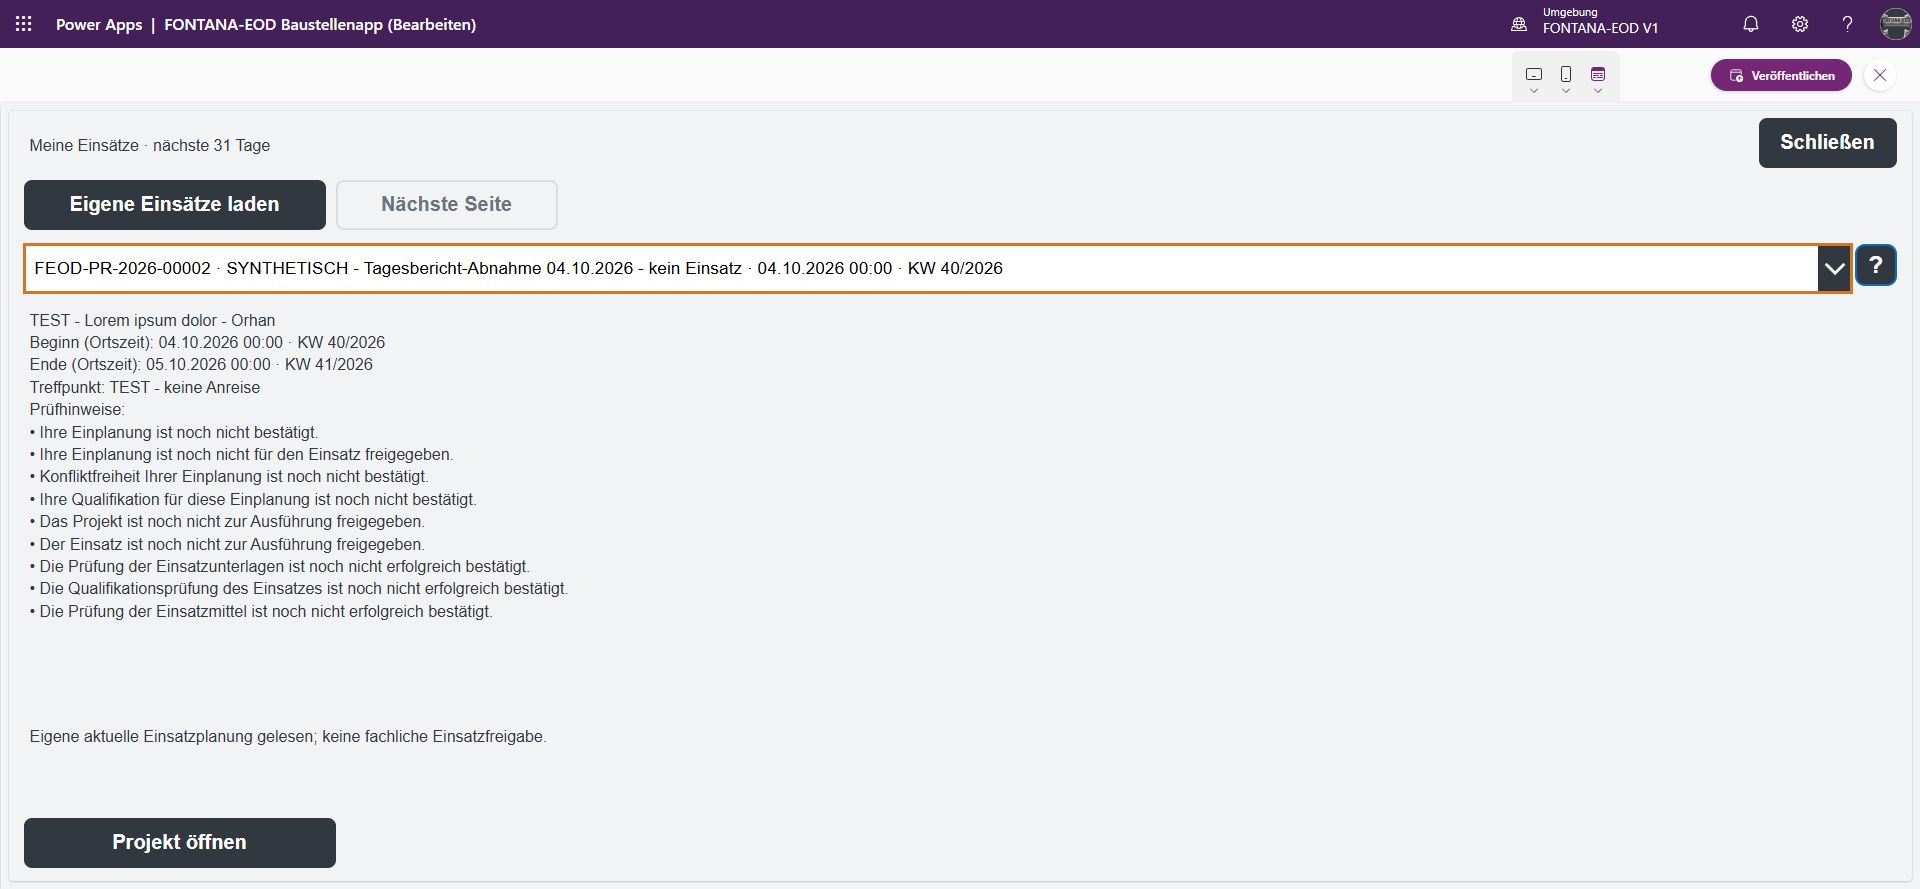
The deployment list focuses on the user's own scheduled assignments over the next 31 days. Load my deployments retrieves the selection. Each entry connects the project with the deployment and its time details, so that tasks with the same name or similar dates can be distinguished.
Selecting an entry first opens the relevant deployment; Open project leads to its project context. The list therefore provides orientation before the details view. Dates, the meeting point and review notes are considered in the next step rather than crowded into the selection list.
After a deployment is selected, its start and end are displayed in local time, along with the meeting point. Review notes appear directly below. They distinguish, among other things, confirmation of scheduling, approval, possible conflicts, and checks of qualifications, documents and resources.
This distinction matters during preparation: reading a planning entry does not replace the required confirmations. Open project provides access to the associated project context. Dates, organisational notes and the status of checks are therefore visible together before further deployment documents are opened.
The first step establishes which project and deployment the daily report belongs to. The view allows the selected project to be carried over and provides access to prepared initial drafts. Data entry therefore starts with the specific task rather than an isolated report text.
If the assignment is still missing, Add project later and Add deployment later are available. Existing initial drafts can be loaded and opened; Next leads to the following step. This keeps an outstanding assignment distinguishable from information already entered.
The first wizard step gives the daily report a heading and report date. Both make it easier to identify later: the heading describes the entry, while the date assigns it to the relevant working day. They therefore appear together at the start of data entry.
If a detail is still outstanding, the form offers Not yet known / add later. Next opens the following step; Back moves backwards within the process. Data entry follows a manageable sequence rather than asking for every detail of the working day at once.
Time entry in the daily report separates the start of work, the end of work and the break in minutes. The working day's time details are kept together rather than having to be found in free-form report text. The break has its own unit, while the start and end remain separate entries.
Here too, an outstanding detail can be marked as unknown or to be added later. Back and Next connect the time step with the rest of the wizard. This supports orderly recording alongside the work performed and working conditions, without deriving a result from incomplete times.
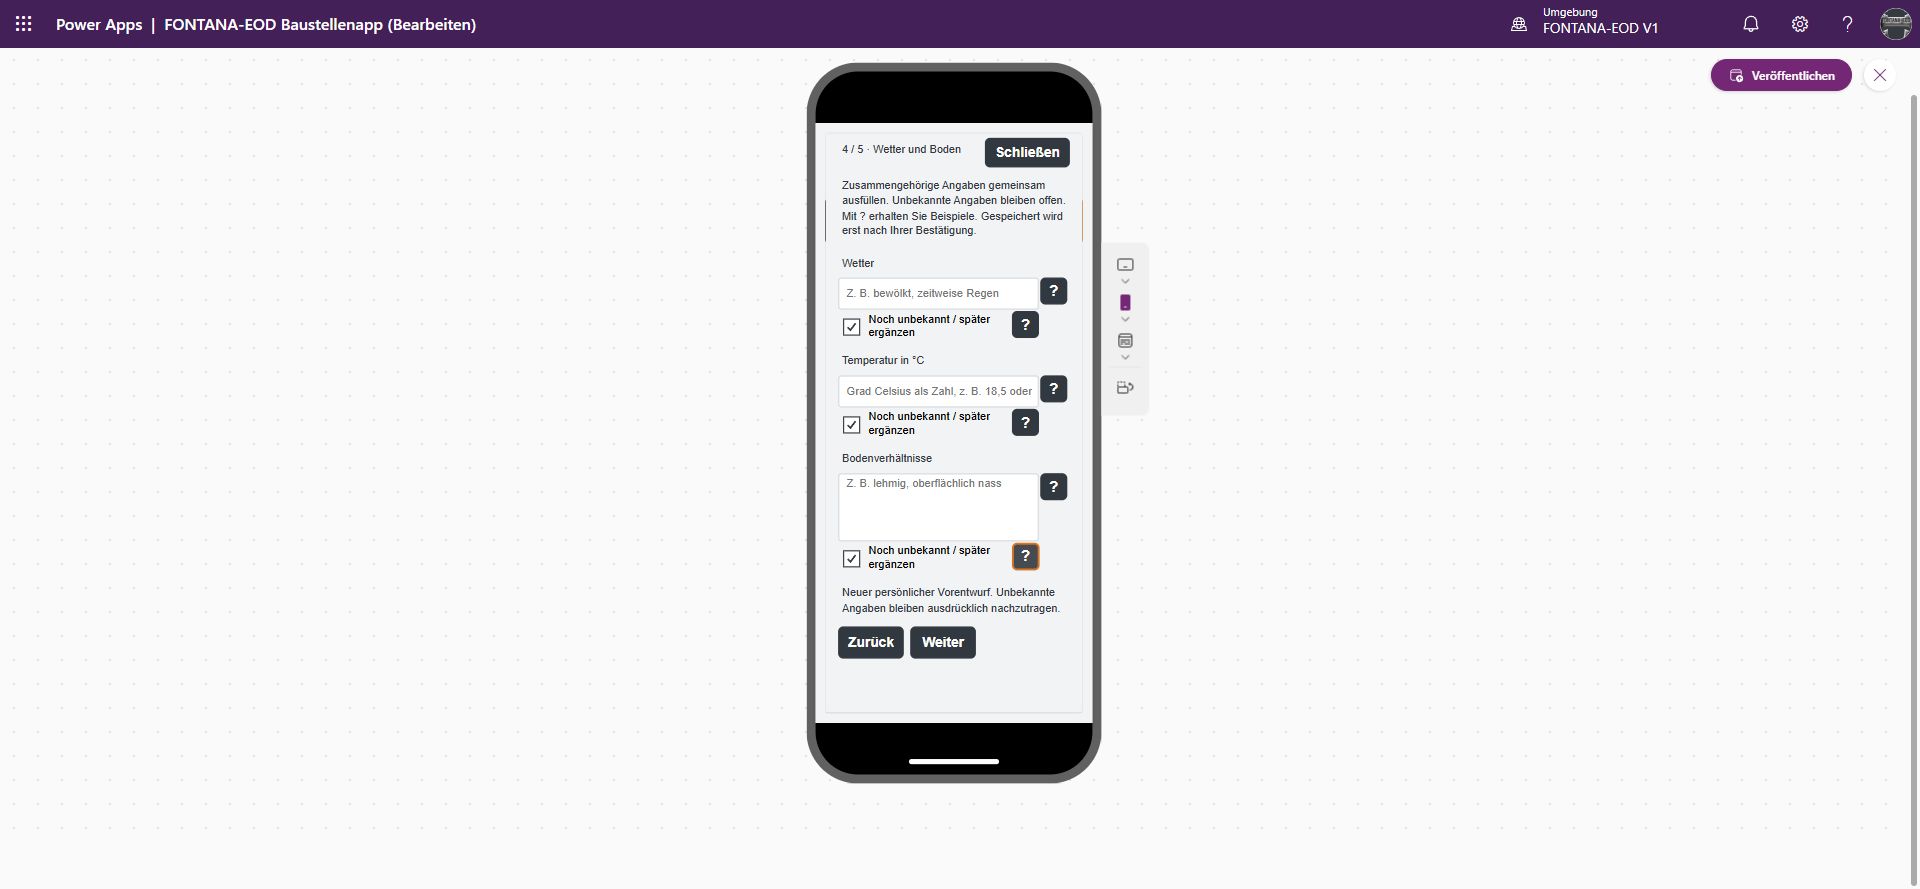
The wizard asks for weather, temperature and ground conditions in a separate step. External conditions can therefore be recorded separately from working times and work performed. These details later provide the context for describing the work.
Not yet known / add later is available for missing information. Back and Next connect the page to the other daily report steps. Observations already available can therefore be entered while outstanding details remain identifiable, without replacing them with a premature estimate.
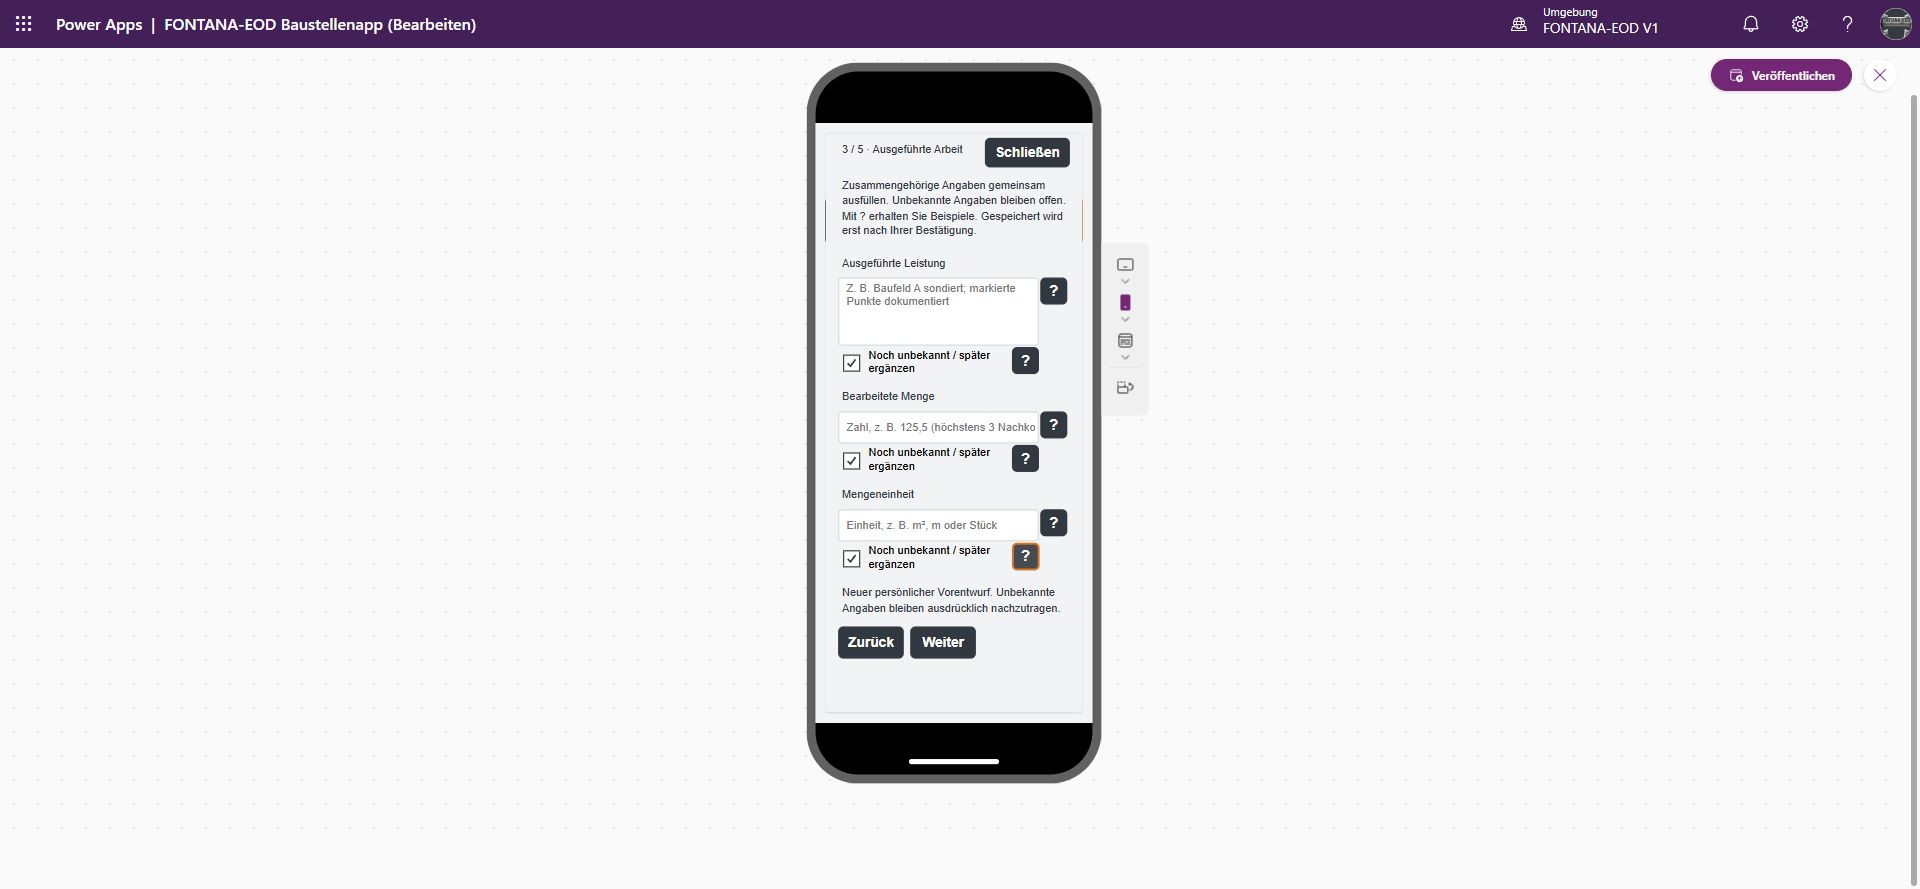
This step records the service performed together with the quantity completed and its unit. The description names the activity; the figure and unit define its extent. This combination makes a quantity in the daily report meaningful.
The wizard keeps these details together in one view. Information that is not yet established can be marked as unknown or to be added later. Back and Next allow movement between adjacent steps without keeping the description and quantities in separate notes.
At the end of the wizard, the entries are reviewed in a summary. The confirmation sits directly beside the saving step. The person preparing the report can therefore go through the combined information again before selecting Save progress.
If something needs to be added or corrected, Back returns to the previous step. Saving progress and checking the entries are visibly linked. It remains clear that this step saves the report's current working version; further editing and technical completion have their own process.
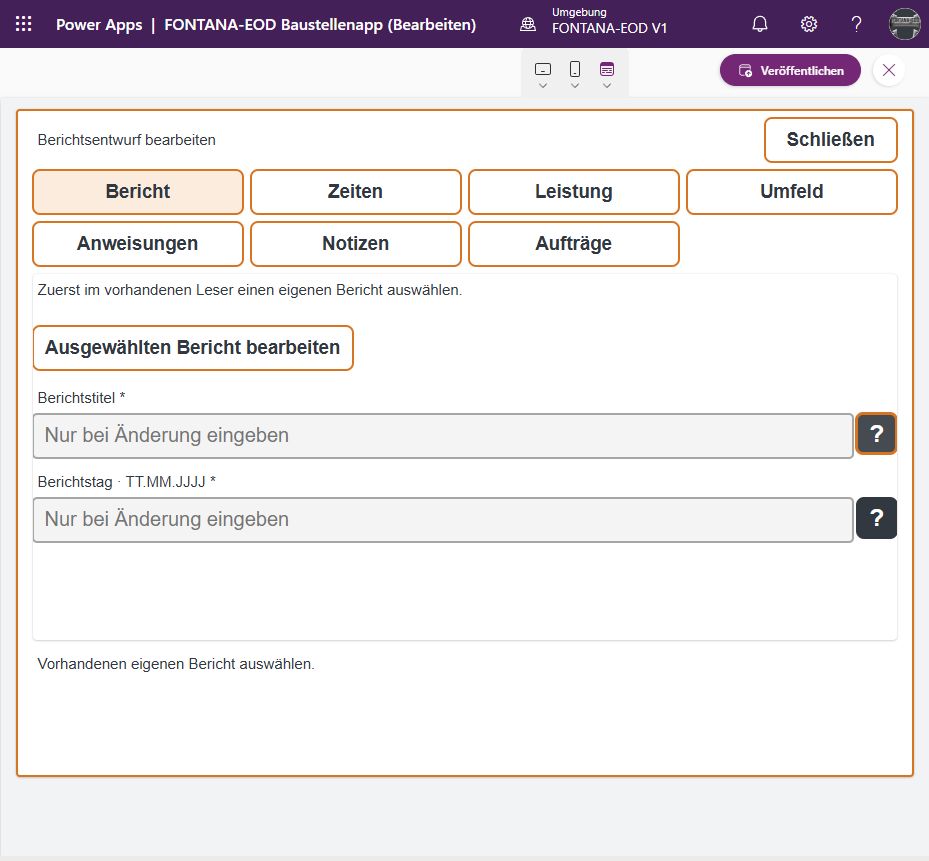
The workspace brings together the information in a daily report. In the Report tab shown, users edit the report title and report date. They first select their own report, then open the relevant version.
The Times, Work performed, Conditions, Instructions, Notes and Orders tabs organise the remaining work. Staff therefore do not have to edit a long report in a single input area. Every entry stays assigned to the selected report and working day.
The Work performed area shows the description together with the quantity completed and its unit. The activity and its recorded extent therefore remain side by side when a report is edited later. A figure is not separated from the work it describes.
The tab provides a focused view of this part of the report. Staff adding to a description or checking the quantity and unit do not need to go through every entry about site conditions. Work performed and external conditions remain separate areas of the same report and can be followed accordingly.
The Conditions area brings weather, temperature and ground conditions together in an existing report. Anyone reading or adding to the conditions for that working day finds them in the same place. They remain separate from the description of the work performed.
This is especially helpful when a report is completed gradually: external conditions can be reviewed directly without searching the work details. The tab forms a distinct part of the report and keeps observations about conditions with the relevant working day.
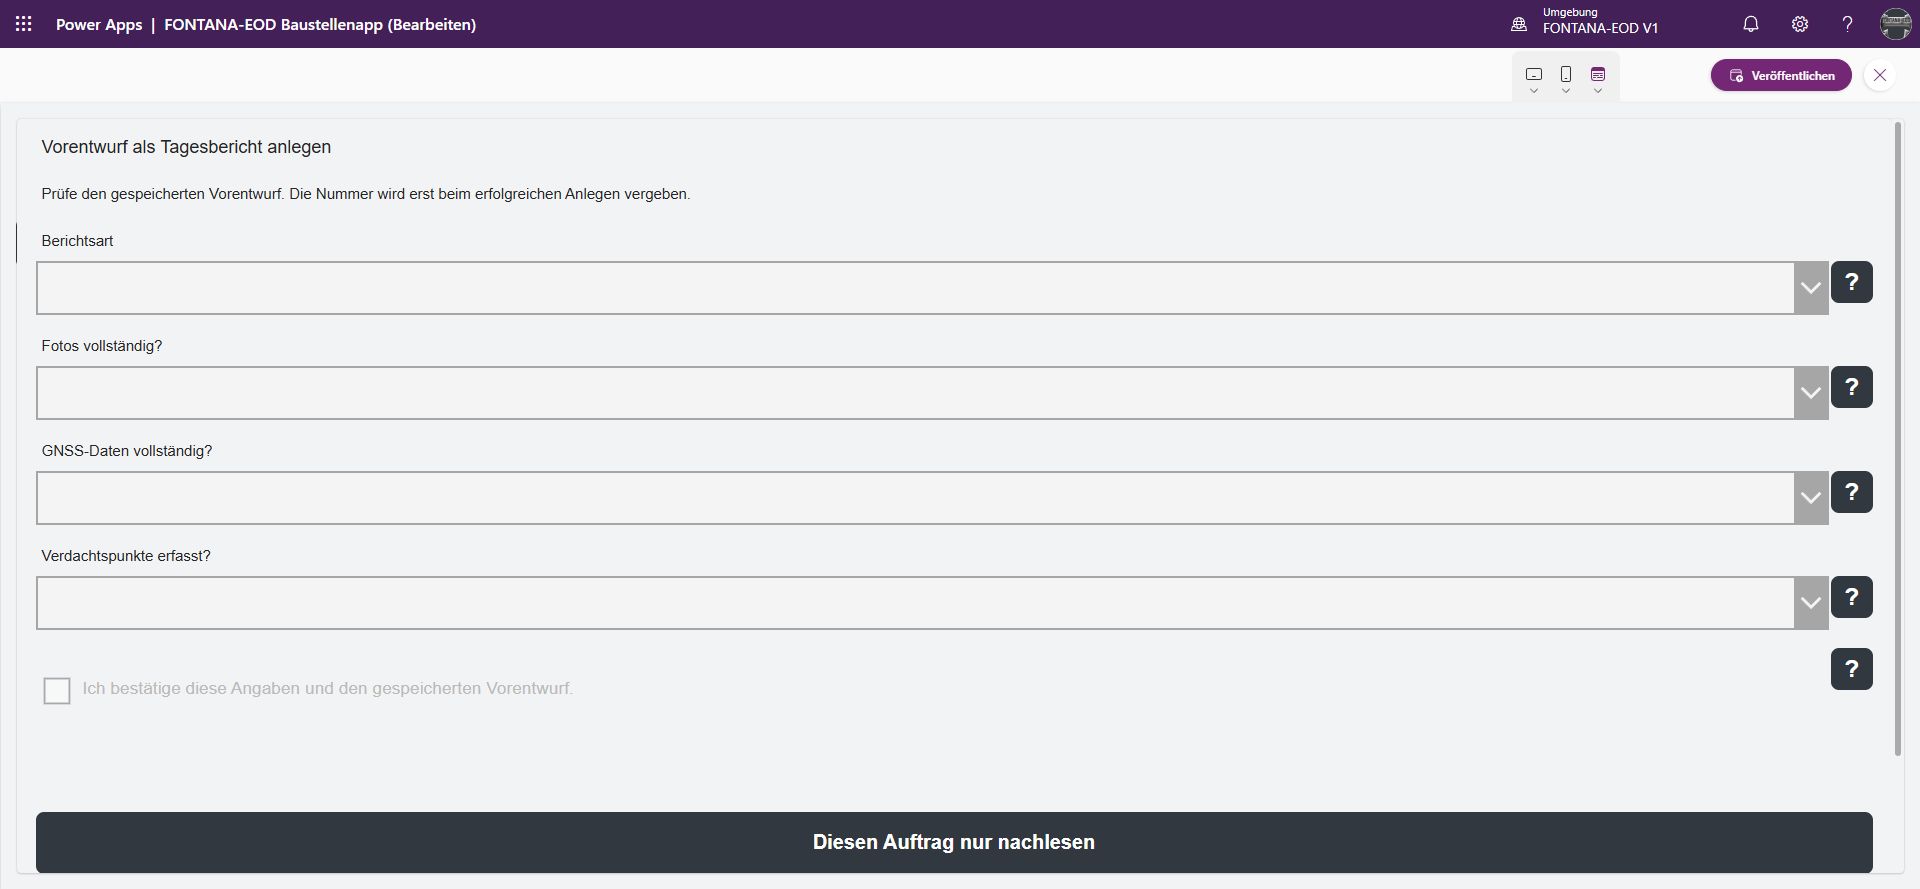
The initial draft brings together the details to be checked before a numbered daily report is created. Alongside the report type, the form asks whether photos and location measurement data are complete and whether suspected points have been recorded. The entries show which supporting material is already available for the report.
Confirmation links the work to the saved initial draft. View this order only provides access to the associated matter. The prepared details and the order therefore share the same work context, without the selection of a report type alone constituting technical confirmation of its contents.
AI assistance: Assistance is being prepared for daily reports to turn selected activity descriptions and notes into editable text suggestions. The original entries remain available alongside them.
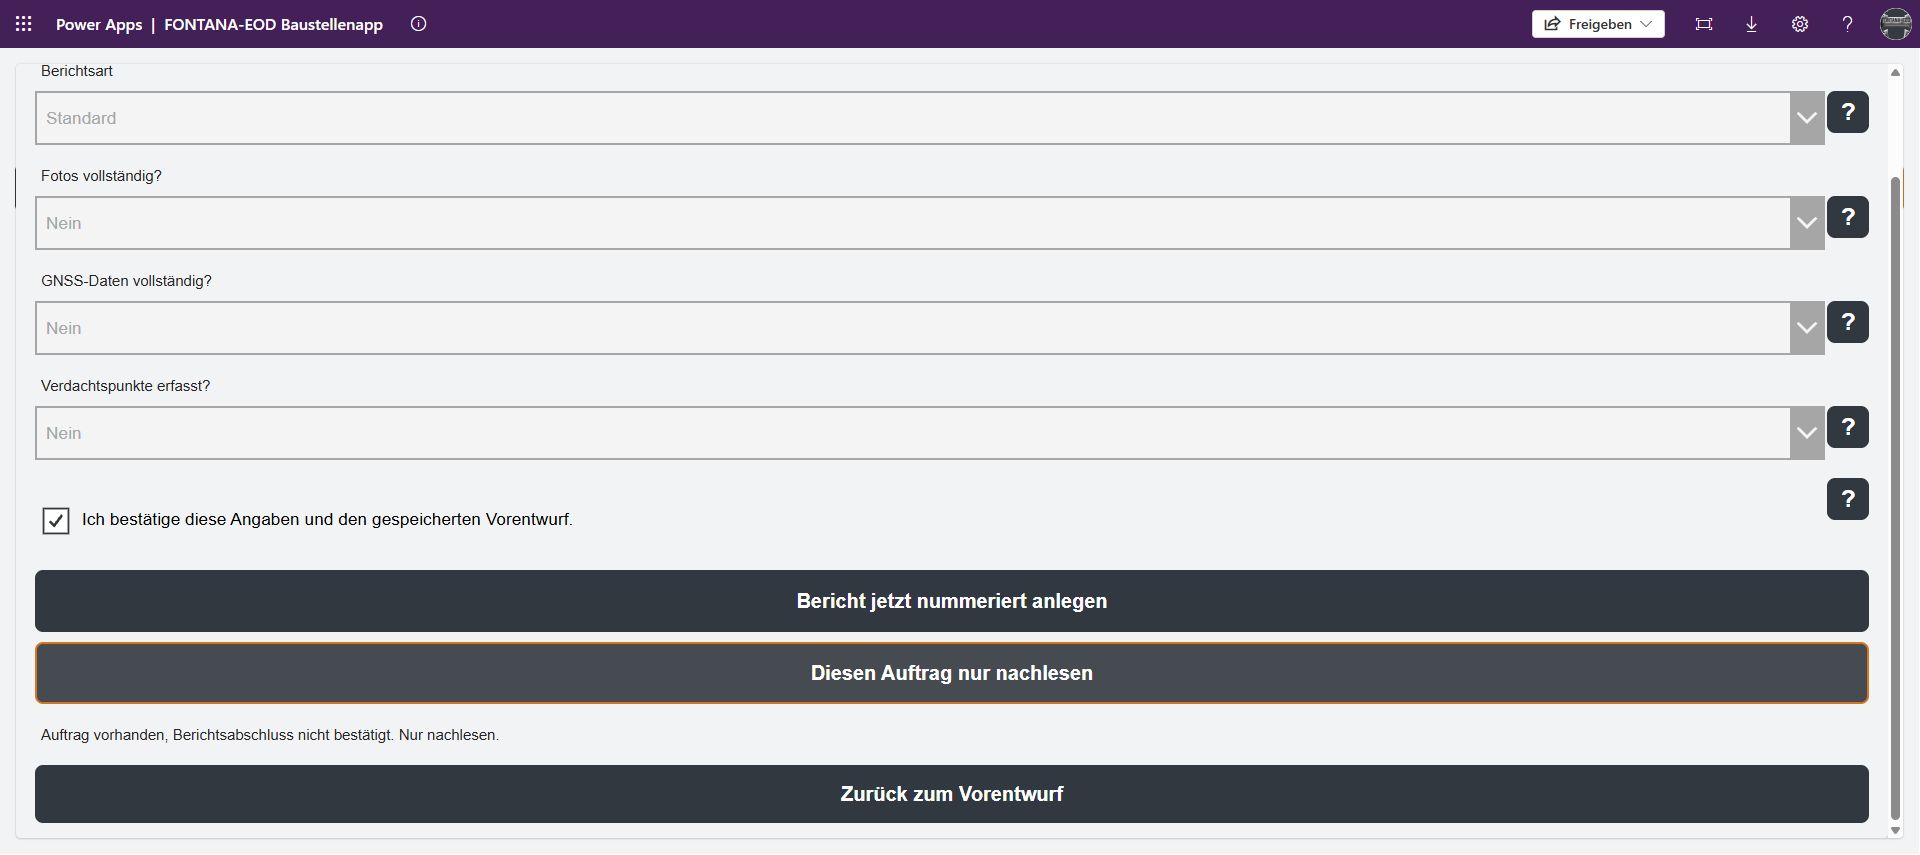
This view brings confirmation of the initial draft and creation of the numbered report together. The report type and completeness details for photos, location measurement data and suspected points remain visible. The confirmation line explicitly refers to these details and the saved initial draft.
The Create numbered report now button is separate from simply viewing the order. There is also a route back to the initial draft. Preparation, creation and viewing are therefore recognisable as different steps. The displayed order status remains separate from confirmed completion of the report, so the two are not confused.
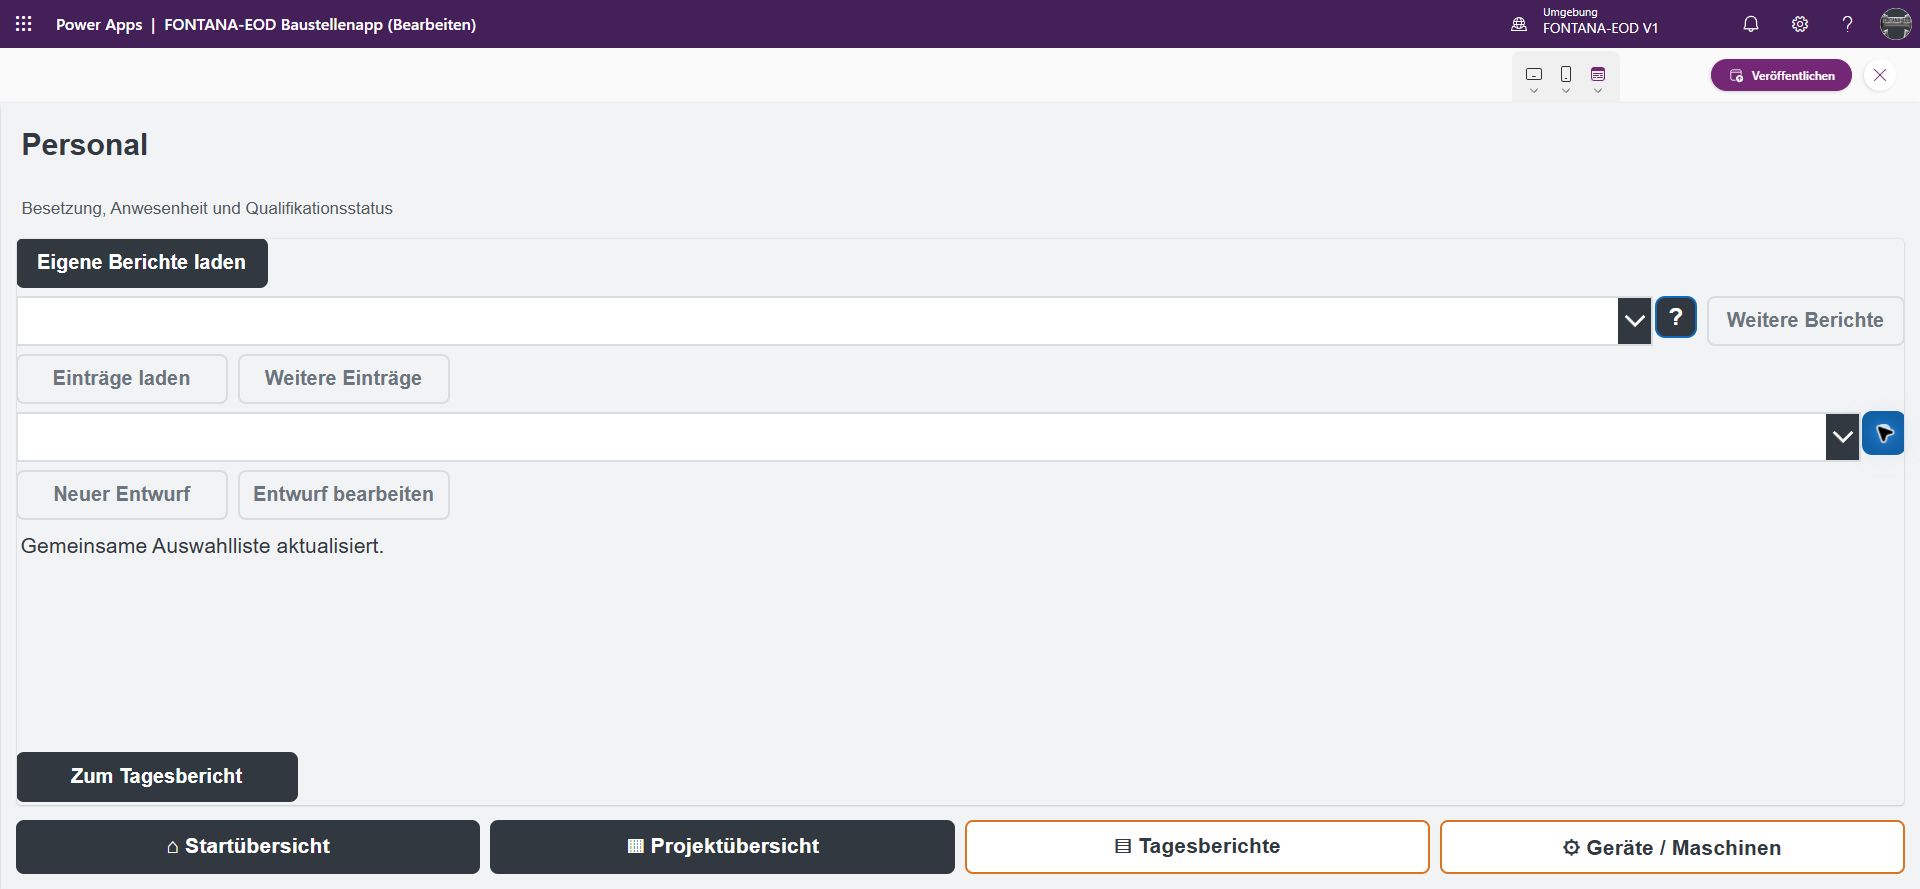
The personnel view assigns the day's staffing details to one of the user's own reports. After a report is selected, existing entries are loaded; New draft or Edit draft starts the focused editing process.
In the intended daily reporting workflow, the people deployed and their roles are linked to the working day. This supports later checks of who took part in which work. Maintaining general qualifications and planning deployments remain separate Cockpit tasks.
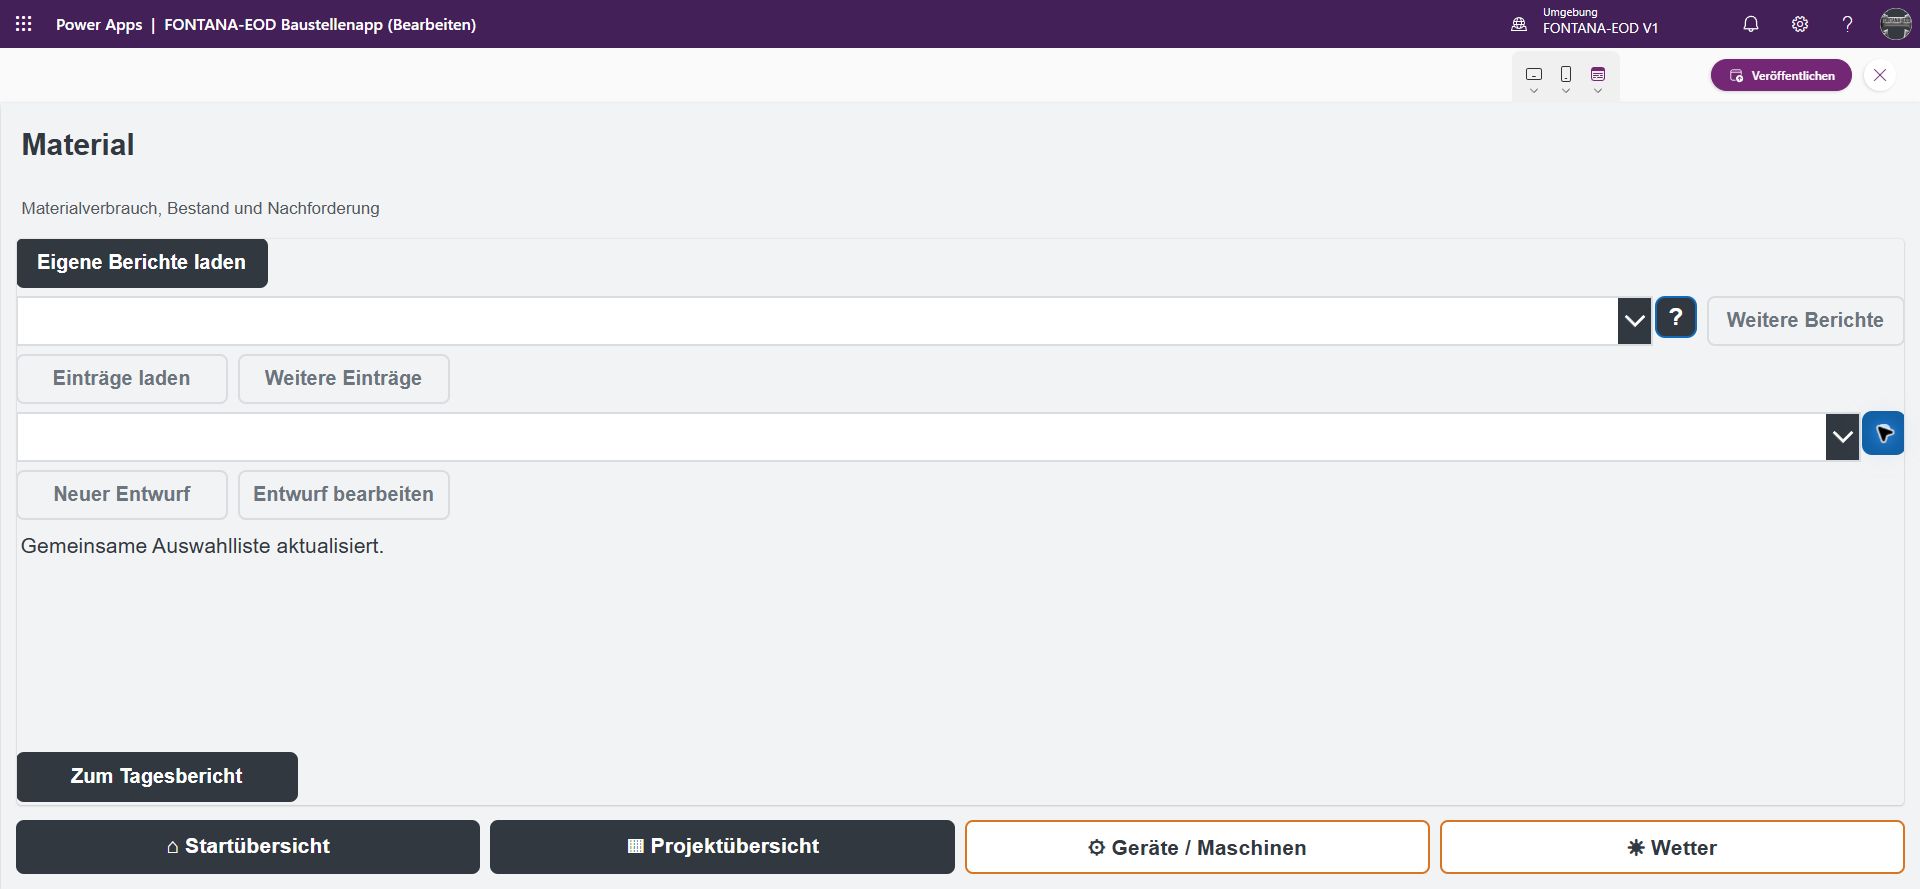
Material details are also opened from the selected report. The list shows the associated drafts and provides separate access points for new entries and changes to existing information.
The intended workflow connects material consumption and additional requirements to the deployment. This helps with office queries and prepares the allocation of actual expenditure. Service items, materials and equipment hours can therefore all be related to the relevant working day.
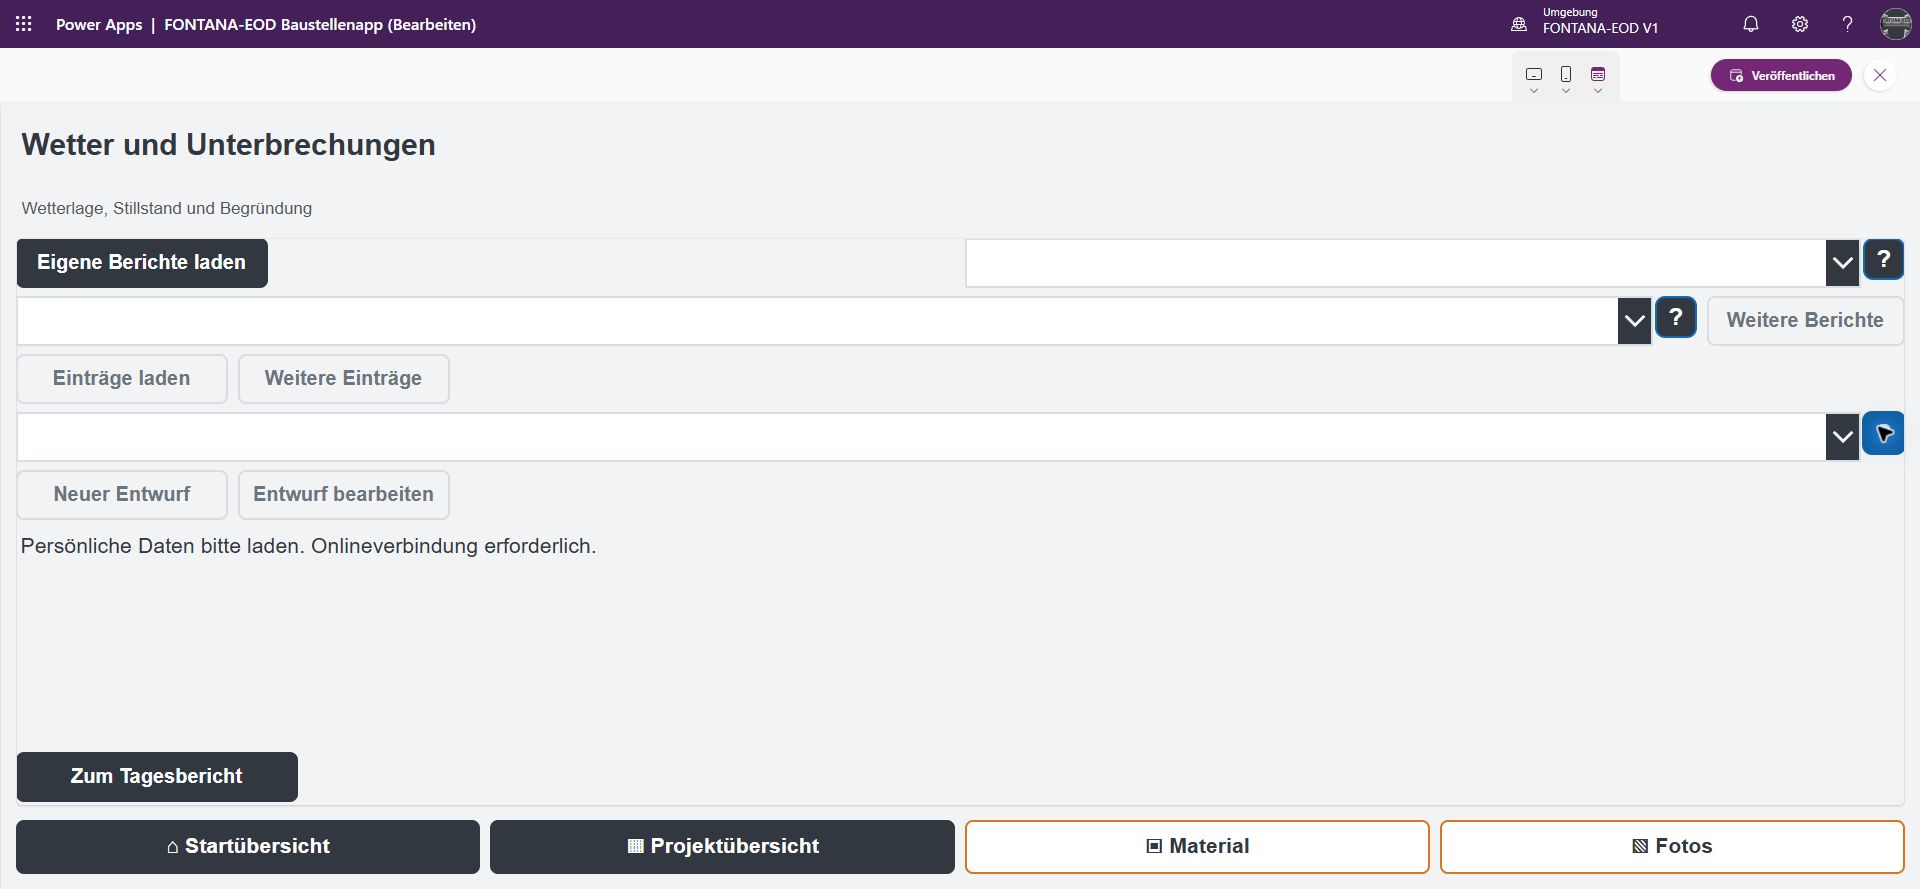
The weather view starts by selecting one of the user's own reports. The associated entries can then be loaded, a new draft created or an existing draft opened. Details of site conditions therefore stay with the correct working day.
This information supplements the record of work performed: weather and site conditions can explain the circumstances of the work and why a process changed. The separate view keeps these details clearly distinct from service items and personnel information.
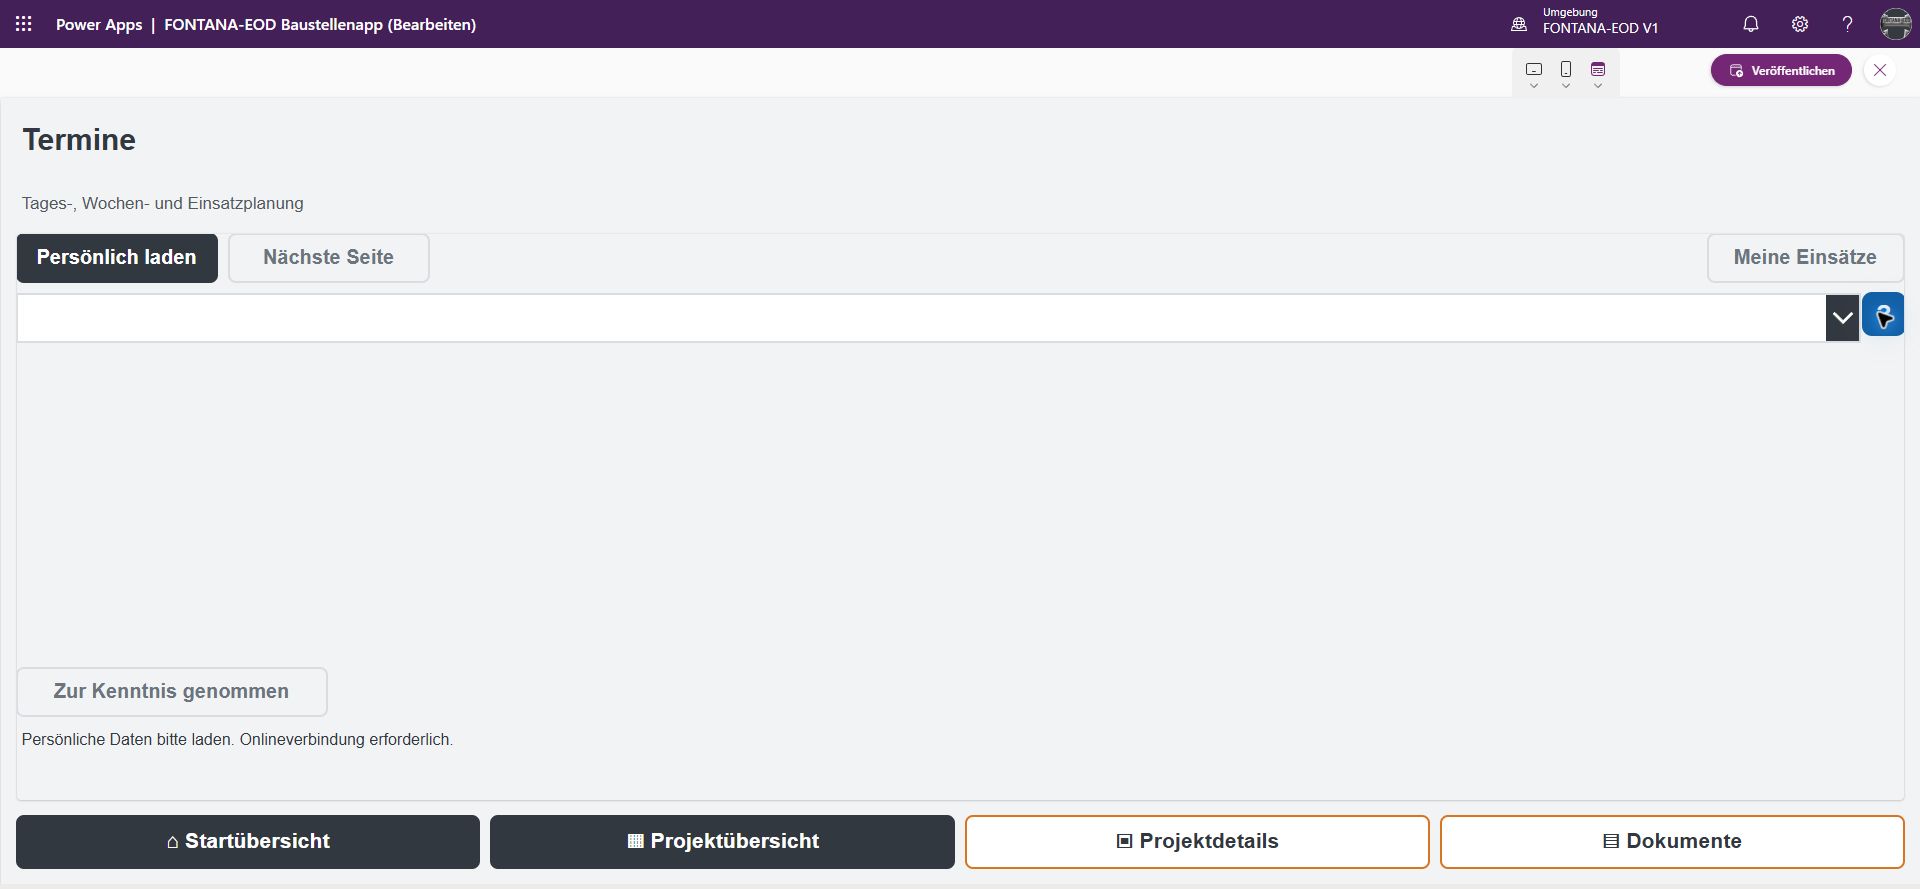
This area loads the dates and notices intended for the person signed in. Further entries can be accessed on the next page; My deployments links them to deployment planning.
The Acknowledged function is intended to provide a deliberate response to the selected entry. The organisation can therefore distinguish between a notice merely being made available and being acknowledged by the person concerned.
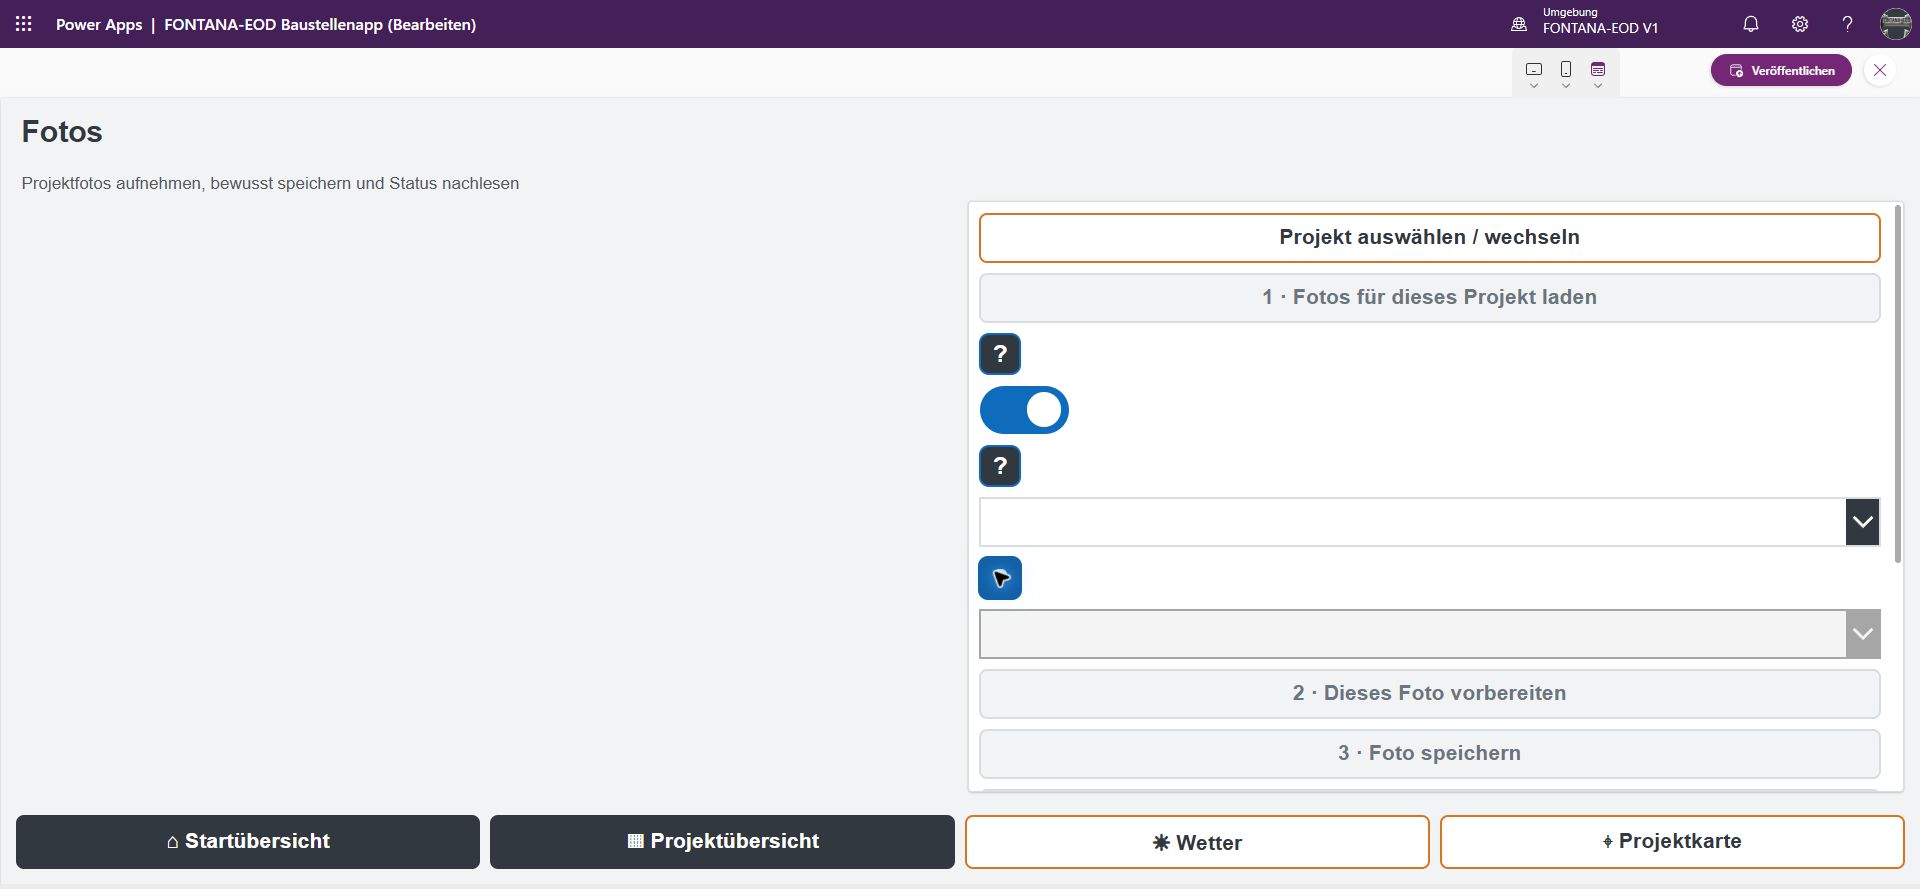
The photo area combines project selection, loading existing images and preparing a new photo. Prepare photo and Save photo are separate steps; the project assignment remains visible throughout.
Images should be findable alongside the associated documentation. They can then be used for queries, review of a daily report or compilation of project documents without losing their connection to the deployment.
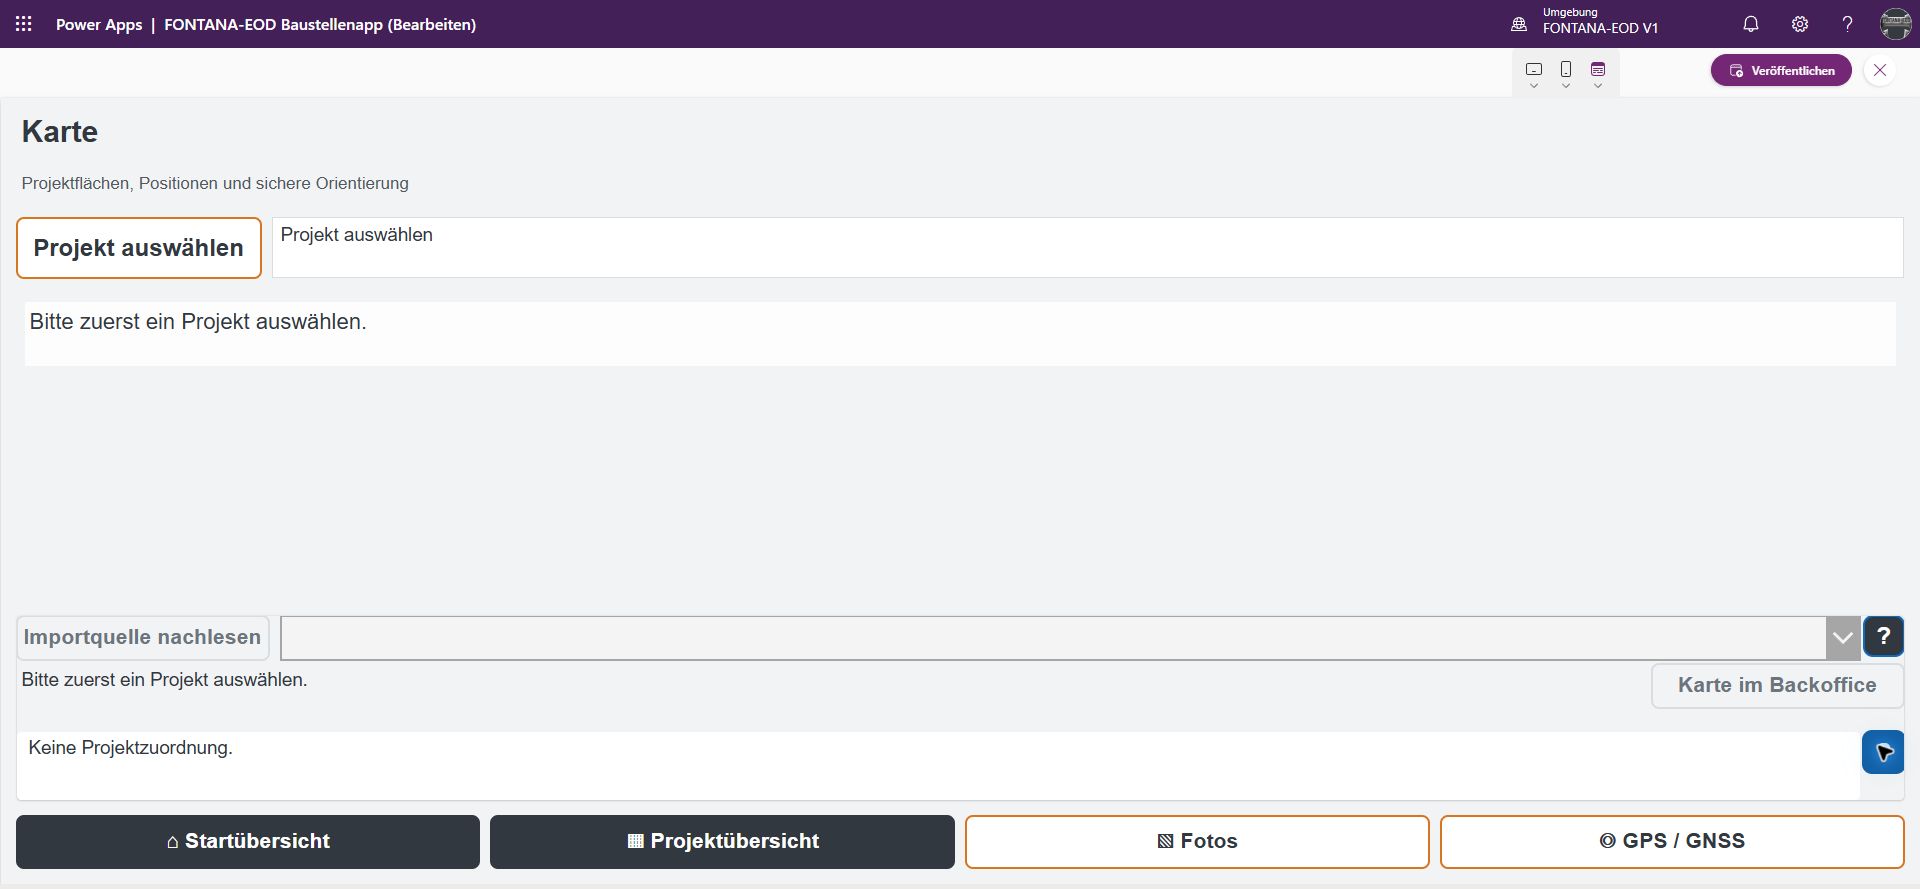
The map view starts with a deliberate project selection. The associated map source can be consulted; Map in back office leads to further processing in the office.
As the platform is expanded, measurement points, investigated areas and processing status are intended to be available in the same project context. Specialist map editing and mobile orientation therefore refer to the same project.
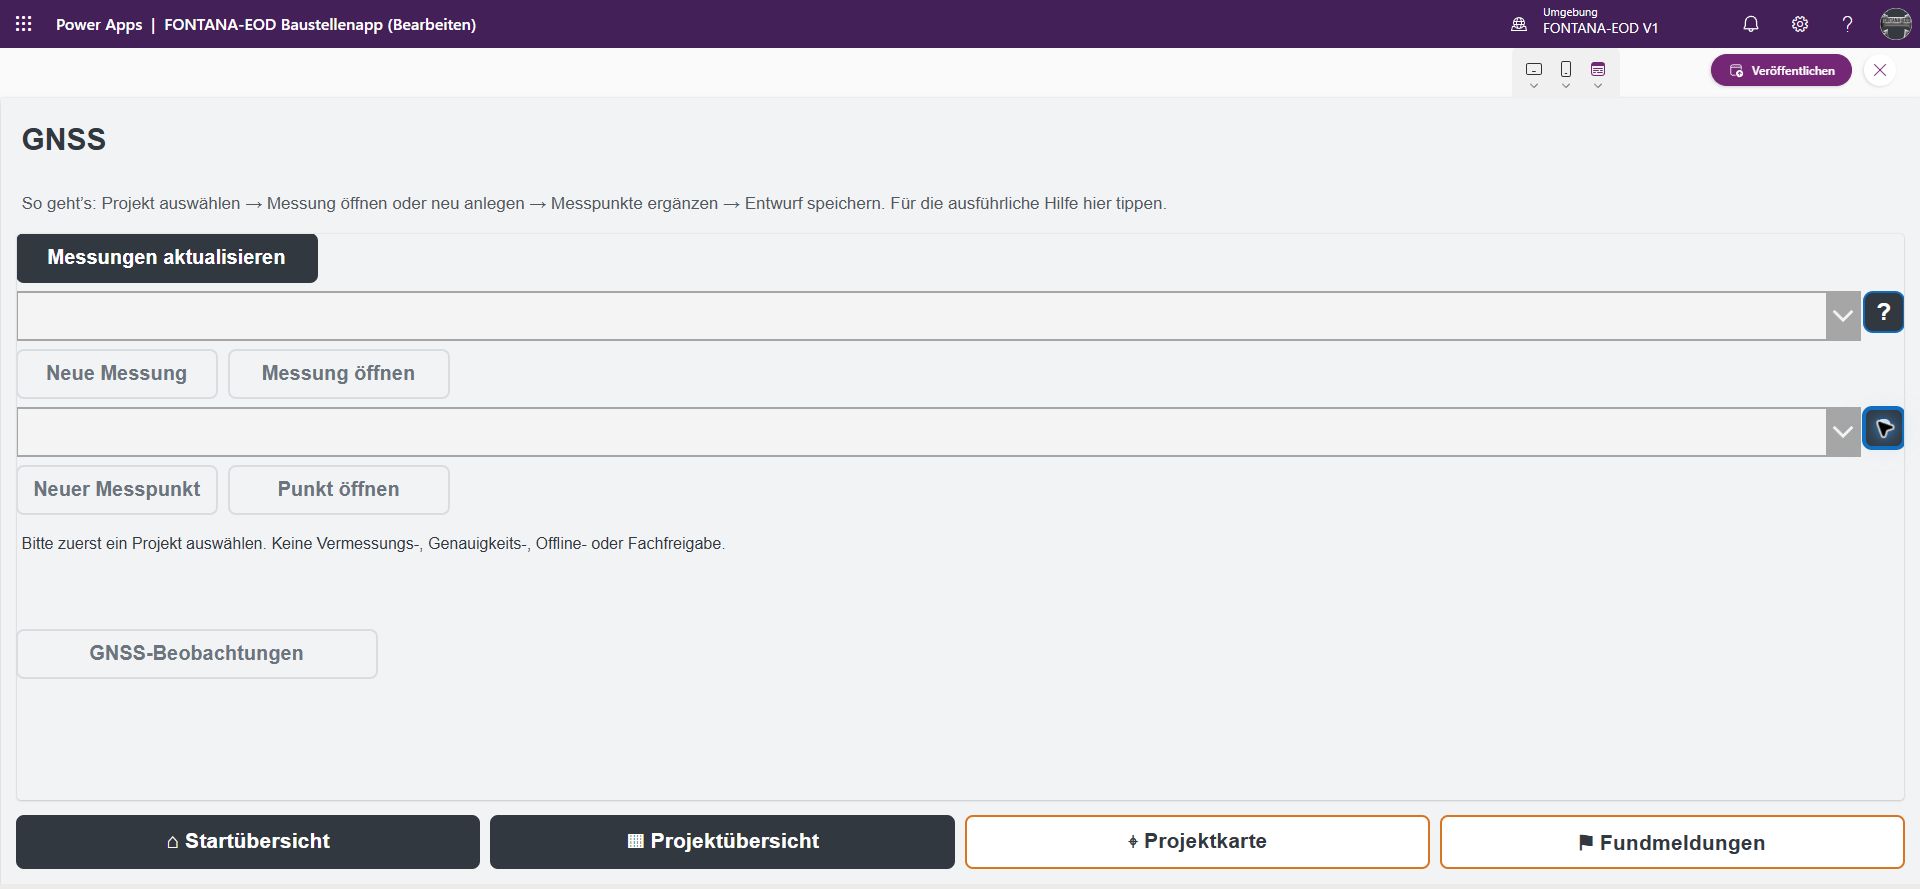
This view organises existing measurements and their measurement points. Refresh measurements reloads the overview. Users can then open a measurement or start a new one; separate access points allow points to be created and opened.
Separating a measurement from its individual points keeps related location information organised. Project context, coordinate system and actual accuracy are essential for subsequent technical use. The overview shown provides access to these processes; the individual input steps are handled separately.
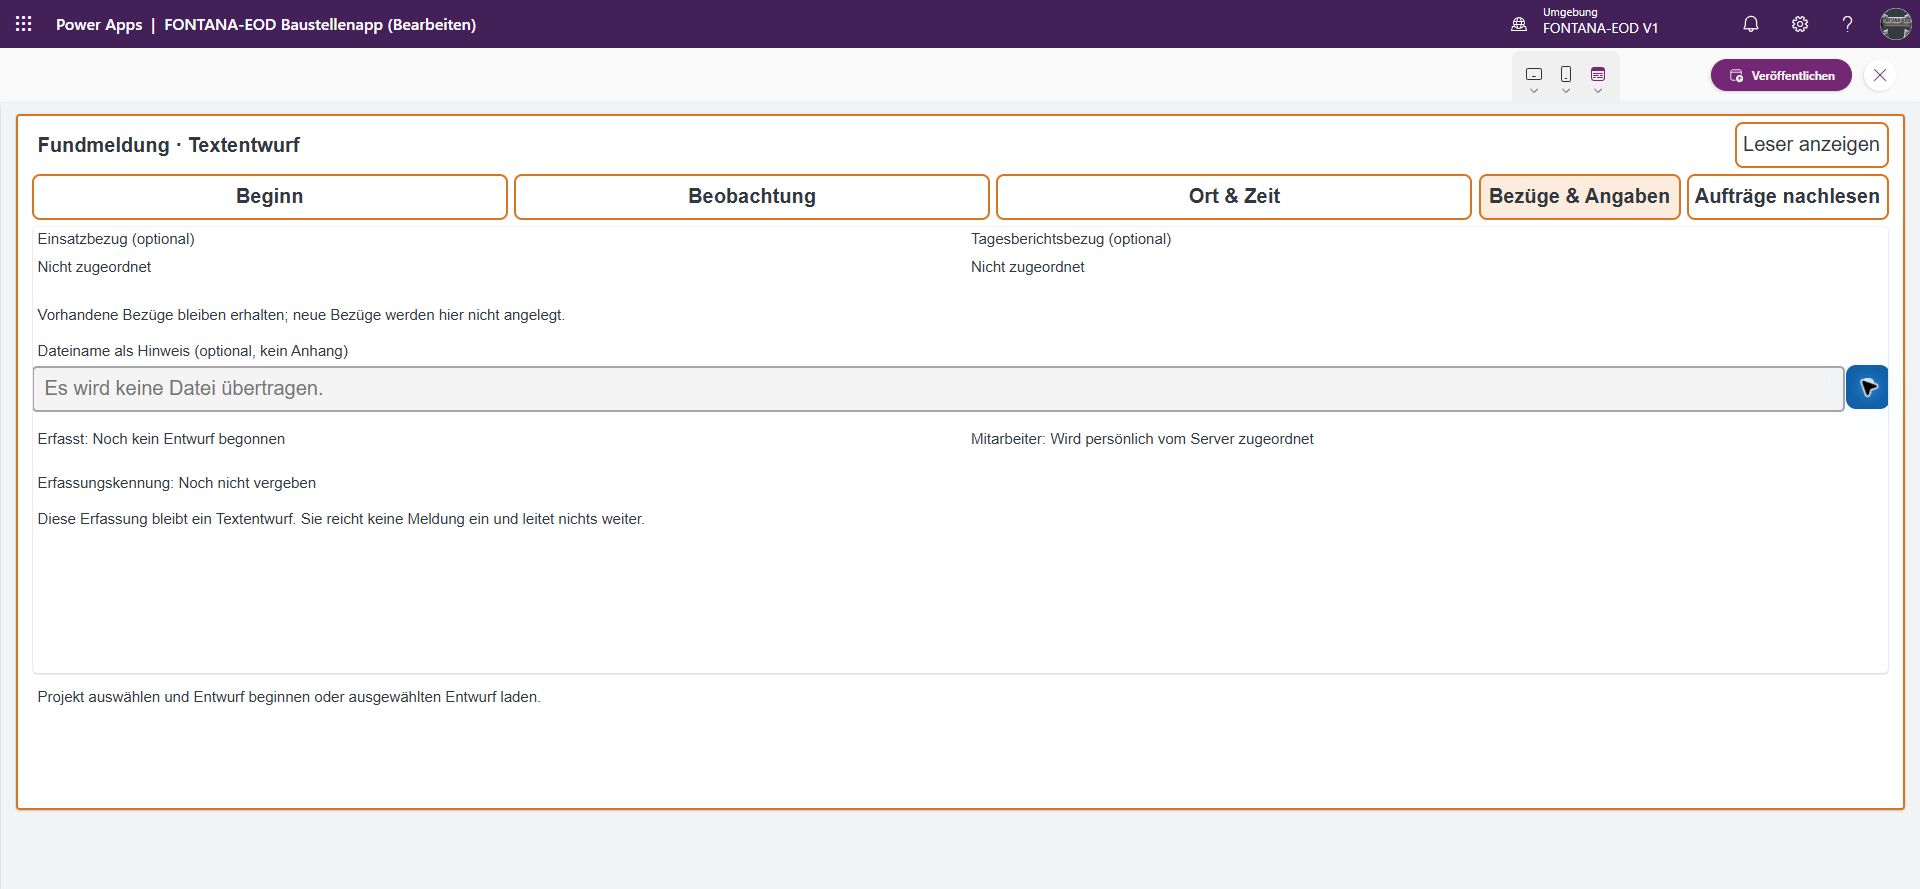
The ordnance find report is divided into several steps: Start, Observation, Location & Time, and References & Details. The view shown indicates whether the draft is already linked to a deployment or daily report. A filename can be added as a reference.
This keeps the observation, timing and project context traceable within one record. Further technical assessment and formal reporting remain the responsibility of the designated people. AI-assisted suggestions may support this review process in future, but they do not make the identification.
The view shown loads the user's own drafts and opens the selected record. It provides the filing context and separate access to preparation, sending, and checking the original and storage status.
In the intended travel receipt workflow, capture, assignment to the deployment and subsequent checking belong together. The status view helps staff follow the progress of work already started. The responsible staff carry out the technical and commercial checks of the receipt.
AI assistance: The plan is to prepare information from receipts and flag possible duplicates. The responsible person then checks the assignment and further processing.
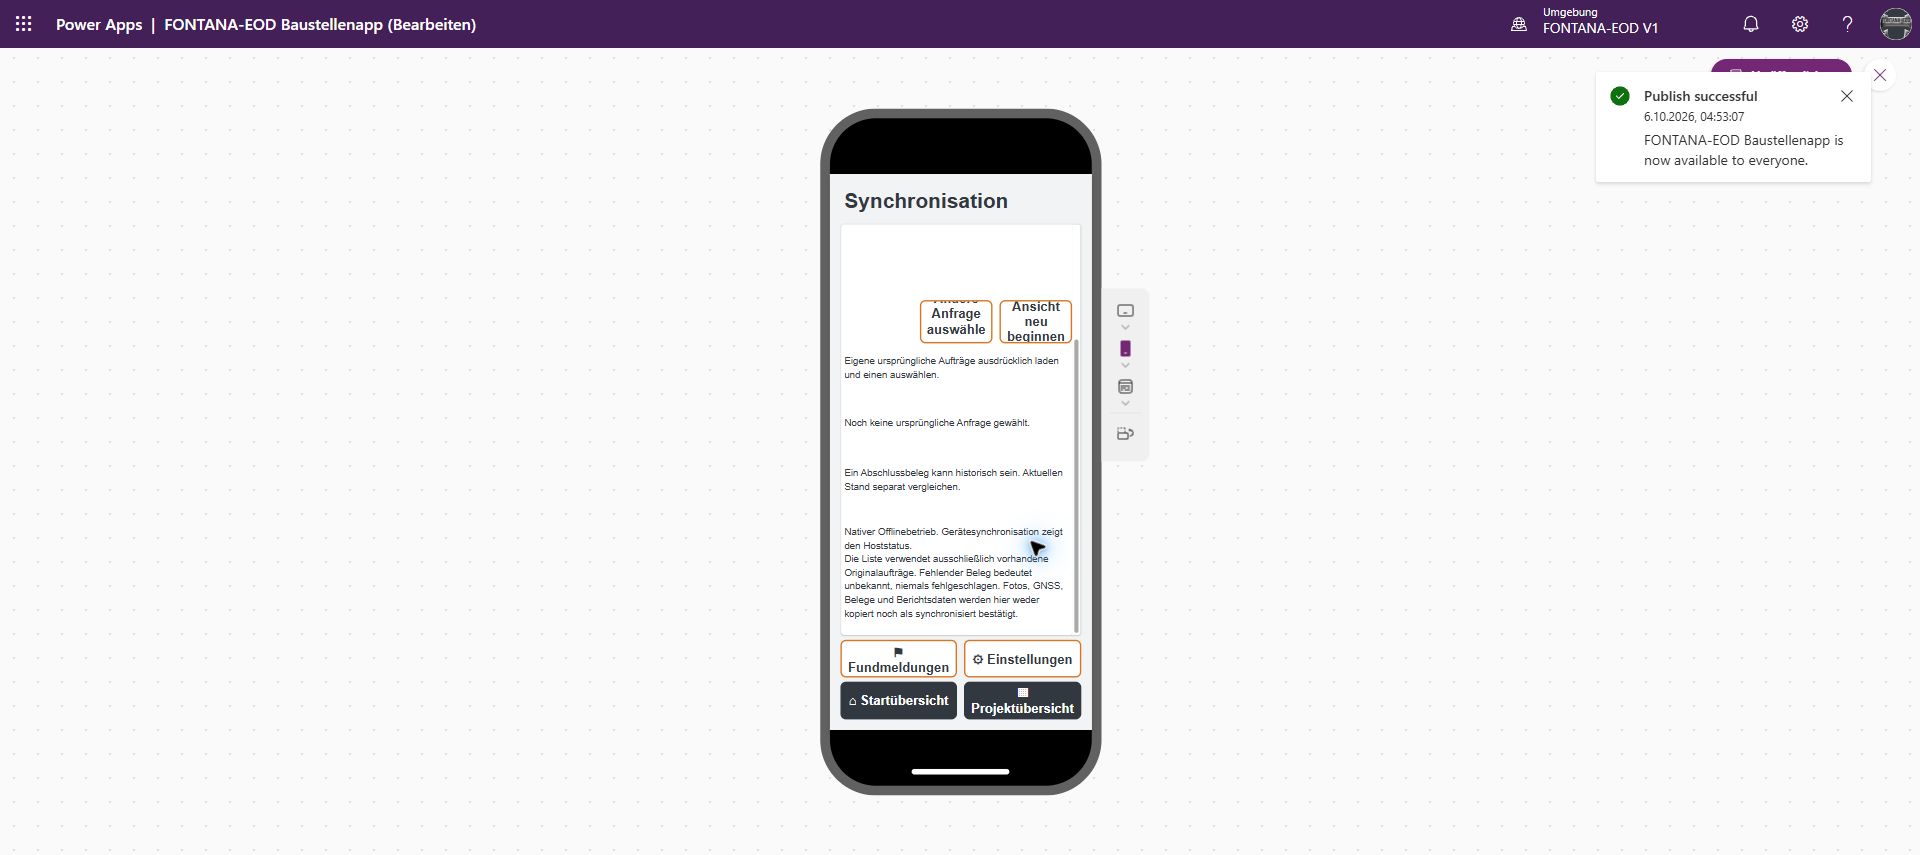
The synchronisation view connects device status with the displayed request and completion statuses. Select request opens the relevant record. Attention is therefore directed to a specific data exchange rather than a general device notice.
Restart view provides a new entry point to this area. Ordnance find reports and settings are also accessible. The status information shown helps users follow a process and narrow down outstanding questions. It remains separate from technical review of a report or approval of a deployment.
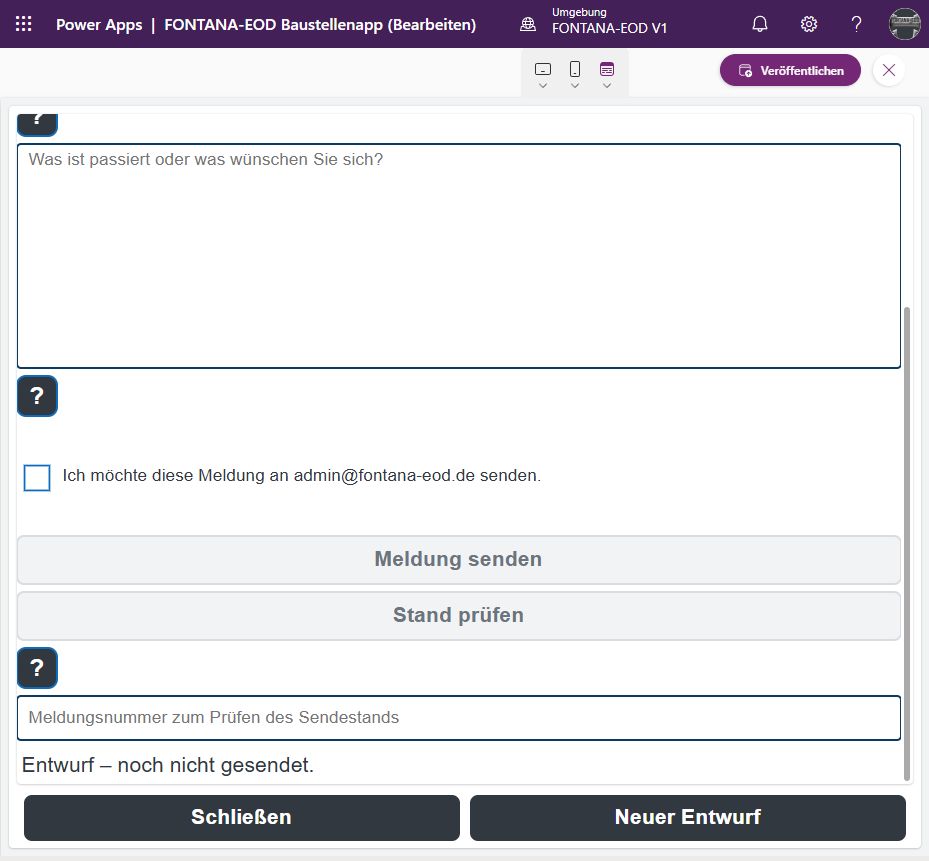
The feedback form records what happened during work or what should be improved. The description is prepared as a draft, then deliberately submitted using Send report; Check status provides subsequent feedback.
This route is intended for specific observations from using the application. Staff can describe a difficulty or suggest an improvement where it arises. This helps bring queries and improvements into further development in an organised way.
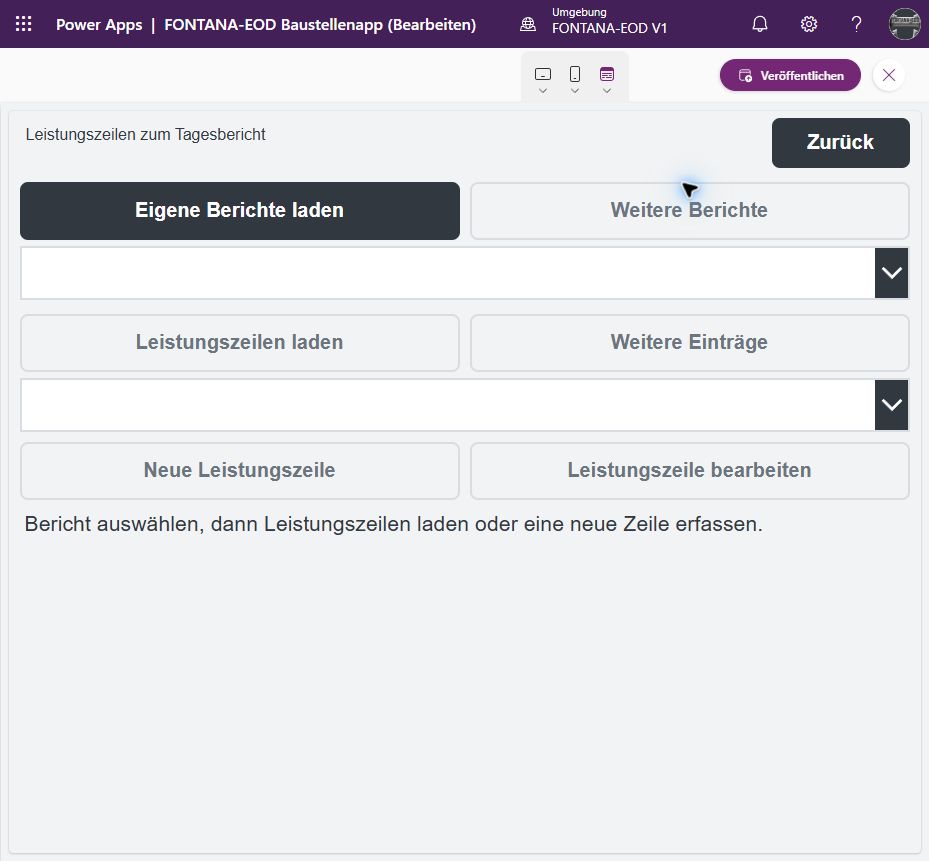
Service items should not sit in a loose note beside the daily report; they should be assigned to the correct report and project. The existing development view shows the intended area for loading the user's own report and creating or editing its service items.
In the intended workflow, staff select an appropriate service, add details of the work actually performed and check the draft before passing it on. Quantities, times and units remain assigned to the relevant report and project.
A planned example workflow starts in the office with known project information and the associated documents. The scheduling team assigns the deployment. Staff on site should then be able to open their deployment and add details of the actual working day to the correct report draft.
Before handover, the draft and output should be consistent when reviewed in readable form. Only then is the report deliberately passed to the office. The office should be able to identify its receipt, project context and the version transmitted. Queries should be able to refer to that exact report.
Connection interruptions are also part of the development scope. The plan is to keep required information available on devices and reconcile changes when the connection returns. This is to be tested with the intended devices and workflows.
A dedicated form is available for ordnance find reports. The photo, description, time and project-related location are intended to belong together. The development form shown illustrates how a report can first be prepared as a draft.
Passing it on should give the responsible people the information they need in a traceable record. Confirmed identification and further action remain with technically authorised personnel. The intended reporting and safety procedures apply independently of any additional search functions.
The mobile scope includes capturing travel receipts, such as hotels, fuel, parking or tickets. A receipt should belong to the correct person and project. After transfer, the information is to be checked and possible duplicate receipts identified.
Authorised staff should be able to check the assignment and completeness, then approve the receipt for further processing. Queries and processing status remain with the receipt. This shows which documents are available and what information is still needed.
Project-specific processing is planned for ground-penetrating radar, geomagnetics, electromagnetic methods and borehole data. The survey brief, investigation area, equipment, raw data, processing and assessment should be connected with a clear record. It must remain identifiable which measurement and version a file belongs to.
Project maps should be able to show measurement points, anomalies, investigated areas and outstanding areas together with their processing status. Map and table outputs should use the same technical assignments. Historical aerial photographs are to be managed with their provenance, capture information, processed version and remaining uncertainty.
The people with technical responsibility select the appropriate parameters and methods and assess the results. The platform is intended to provide them with the related information and keep outstanding work steps visible.
Our measurement example from Plattling shows why measurement data, interpretation and subsequent work steps must be kept distinct. Requirements for Survey report and clearance record continue to depend on the actual task.
Planned document output includes covering letters, quotations, daily reports, clearance concepts, map appendices, ordnance find and handover records, and final reports. Templates are intended to use the relevant project details. Preparing a concept brings together the available documents, selected methods and project-specific requirements.
In supporting records and clearance documents, the investigation area, depth, method, period and limits of the conclusion must agree. Outstanding matters and missing evidence should be visible before final output. The responsible people review and decide; the software does not issue technical clearance.
An editable draft, checked PDF version, signature, filing and deliberate sending are intended to form one connected process. Office staff should be able to see which version is being edited, which is awaiting review and which has been issued.
AI assistance: When preparing concepts, information from original documents is to be brought together with its source passage. The responsible specialist checks the information and decides on the version.
Analyses are planned for quotations, deadlines, utilisation, project profitability and existing reports. Outstanding evidence, survey and map status, and data transfer errors should also be visible. Each metric must make clear which data and period it represents.
A reporting area with explanations is already available. The planned views should show the information needed at the time, such as outstanding deadlines, utilisation or project status. Clear explanations of metrics and identifiable data versions help users interpret them.
Shared project entry points are planned for office work: select a project, find documents, use a template or file an edited document in the correct record. Emails and attachments should be assignable to a matter. Replies, tasks and follow-up reminders should stay connected to that context.
Text documents, estimating spreadsheets and presentations should use the same project information without creating a second, independent register. Recipients, document version and approval must be checked before sending. These connections are being expanded; the complete personal file-handling and sending process is still being tested.
The office, scheduling team, project management, site team and finance need different information. The development plan provides for individual access and role-based views. An assigned site should provide the information required for that work without transferring all personnel or financial data to the device.
Changes, queries, approvals and withdrawn versions should remain traceable. Development takes account of different tasks and responsibilities. Individual sign-in and work with the intended user roles and devices are being tested together.
Assistance with data capture, summaries and preparation of suggestions is planned for suitable tasks. Examples include assigning incoming documents and providing reasoned pointers for further work. Uncertain information must be presented for review rather than entering a definitive project record unchecked.
A specialist-maintained knowledge and image search is part of a later expansion stage. It is intended to show comparison features, sources, differences and uncertainty, and support technical research.
Authoritative calculations, access and approvals remain subject to clear rules and responsible people. The platform is intended to provide the information needed for a decision and document that decision.
The next steps connect the existing areas into a continuous workflow. They include individual use on the intended devices, work during connection interruptions, and complete document output and handover.
Introduction also includes orderly migration of existing documents, clear help, updates, and backup and restoration of project information. Staff should be able to complete their tasks with the information they need.
We will report further progress through specific functions and practical examples. For clients, the agreed Specialist service, actual project scope and clear documentation remain decisive. More about FONTANA-EOD.
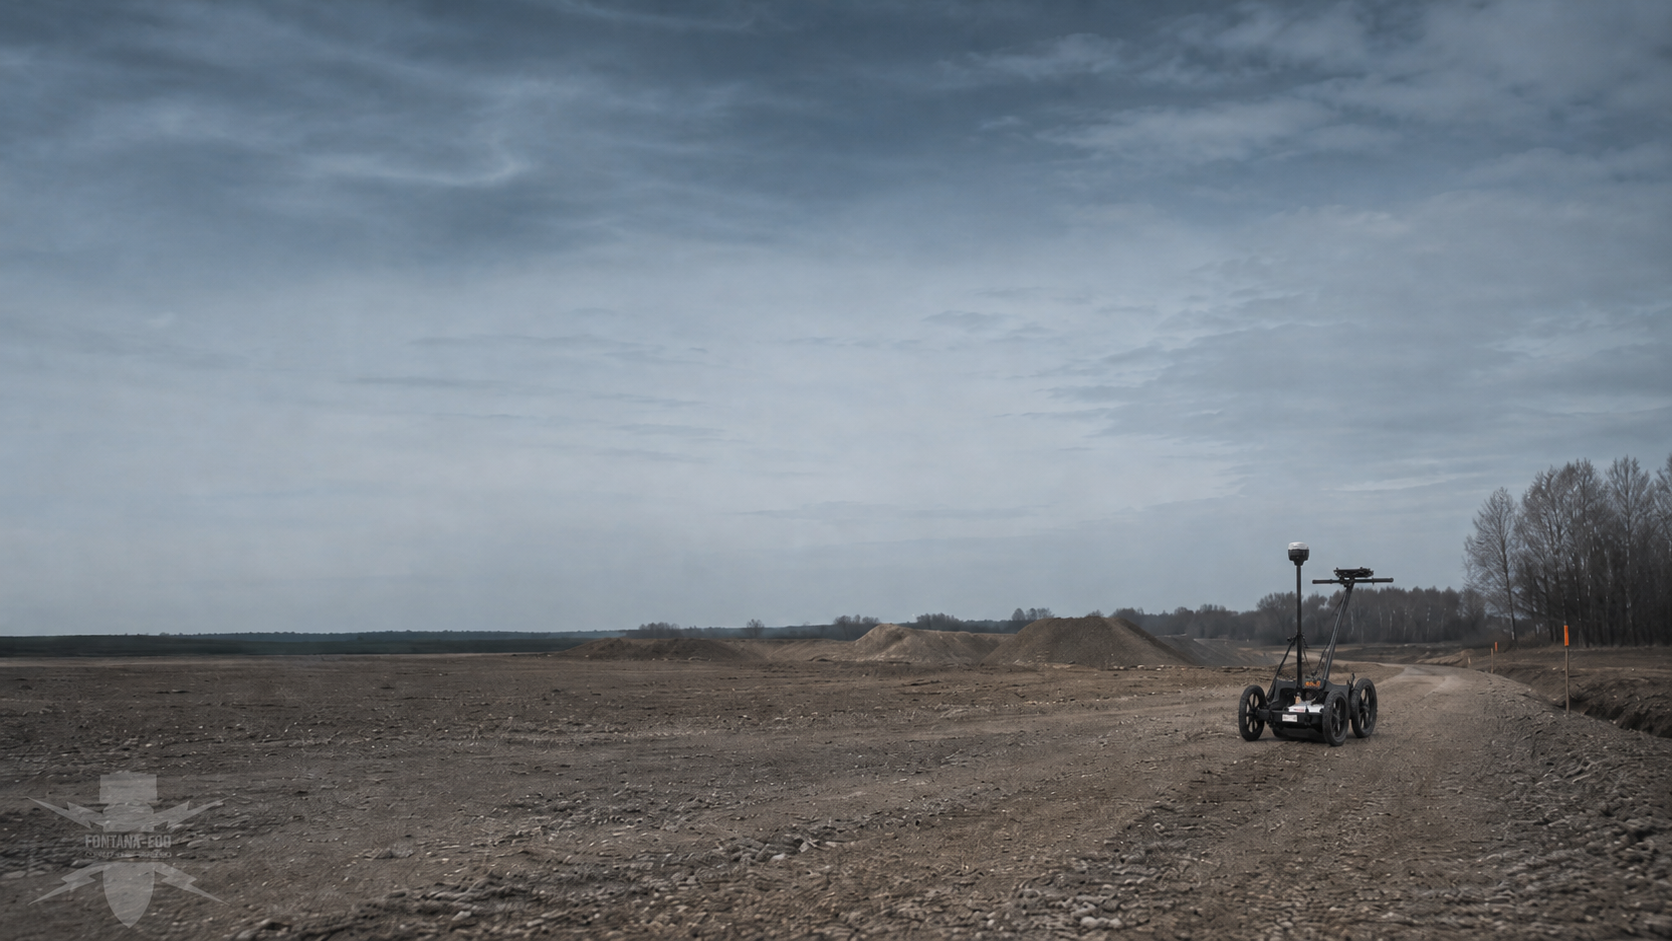
Whether historical aerial photograph analysis, explosive ordnance surveying, surface surveying using GPR, magnetometry or TDEM, deep-ground surveys, downhole surveys, excavation supervision, area clearance or ordnance recovery is needed depends on the location, ground disturbance, depth, ground and existing documents. An early ordnance assessment provides clarity for tendering, programming, occupational safety and construction.
FONTANA-EOD combines its Section 7 SprengG licence, specialists holding Section 20 SprengG certificates of competence, suitable survey and clearance methods, and traceable documentation. Send the site plan, depth of ground disturbance, construction phase and existing documents for an initial technical assessment.